Raven's Rescue Resources
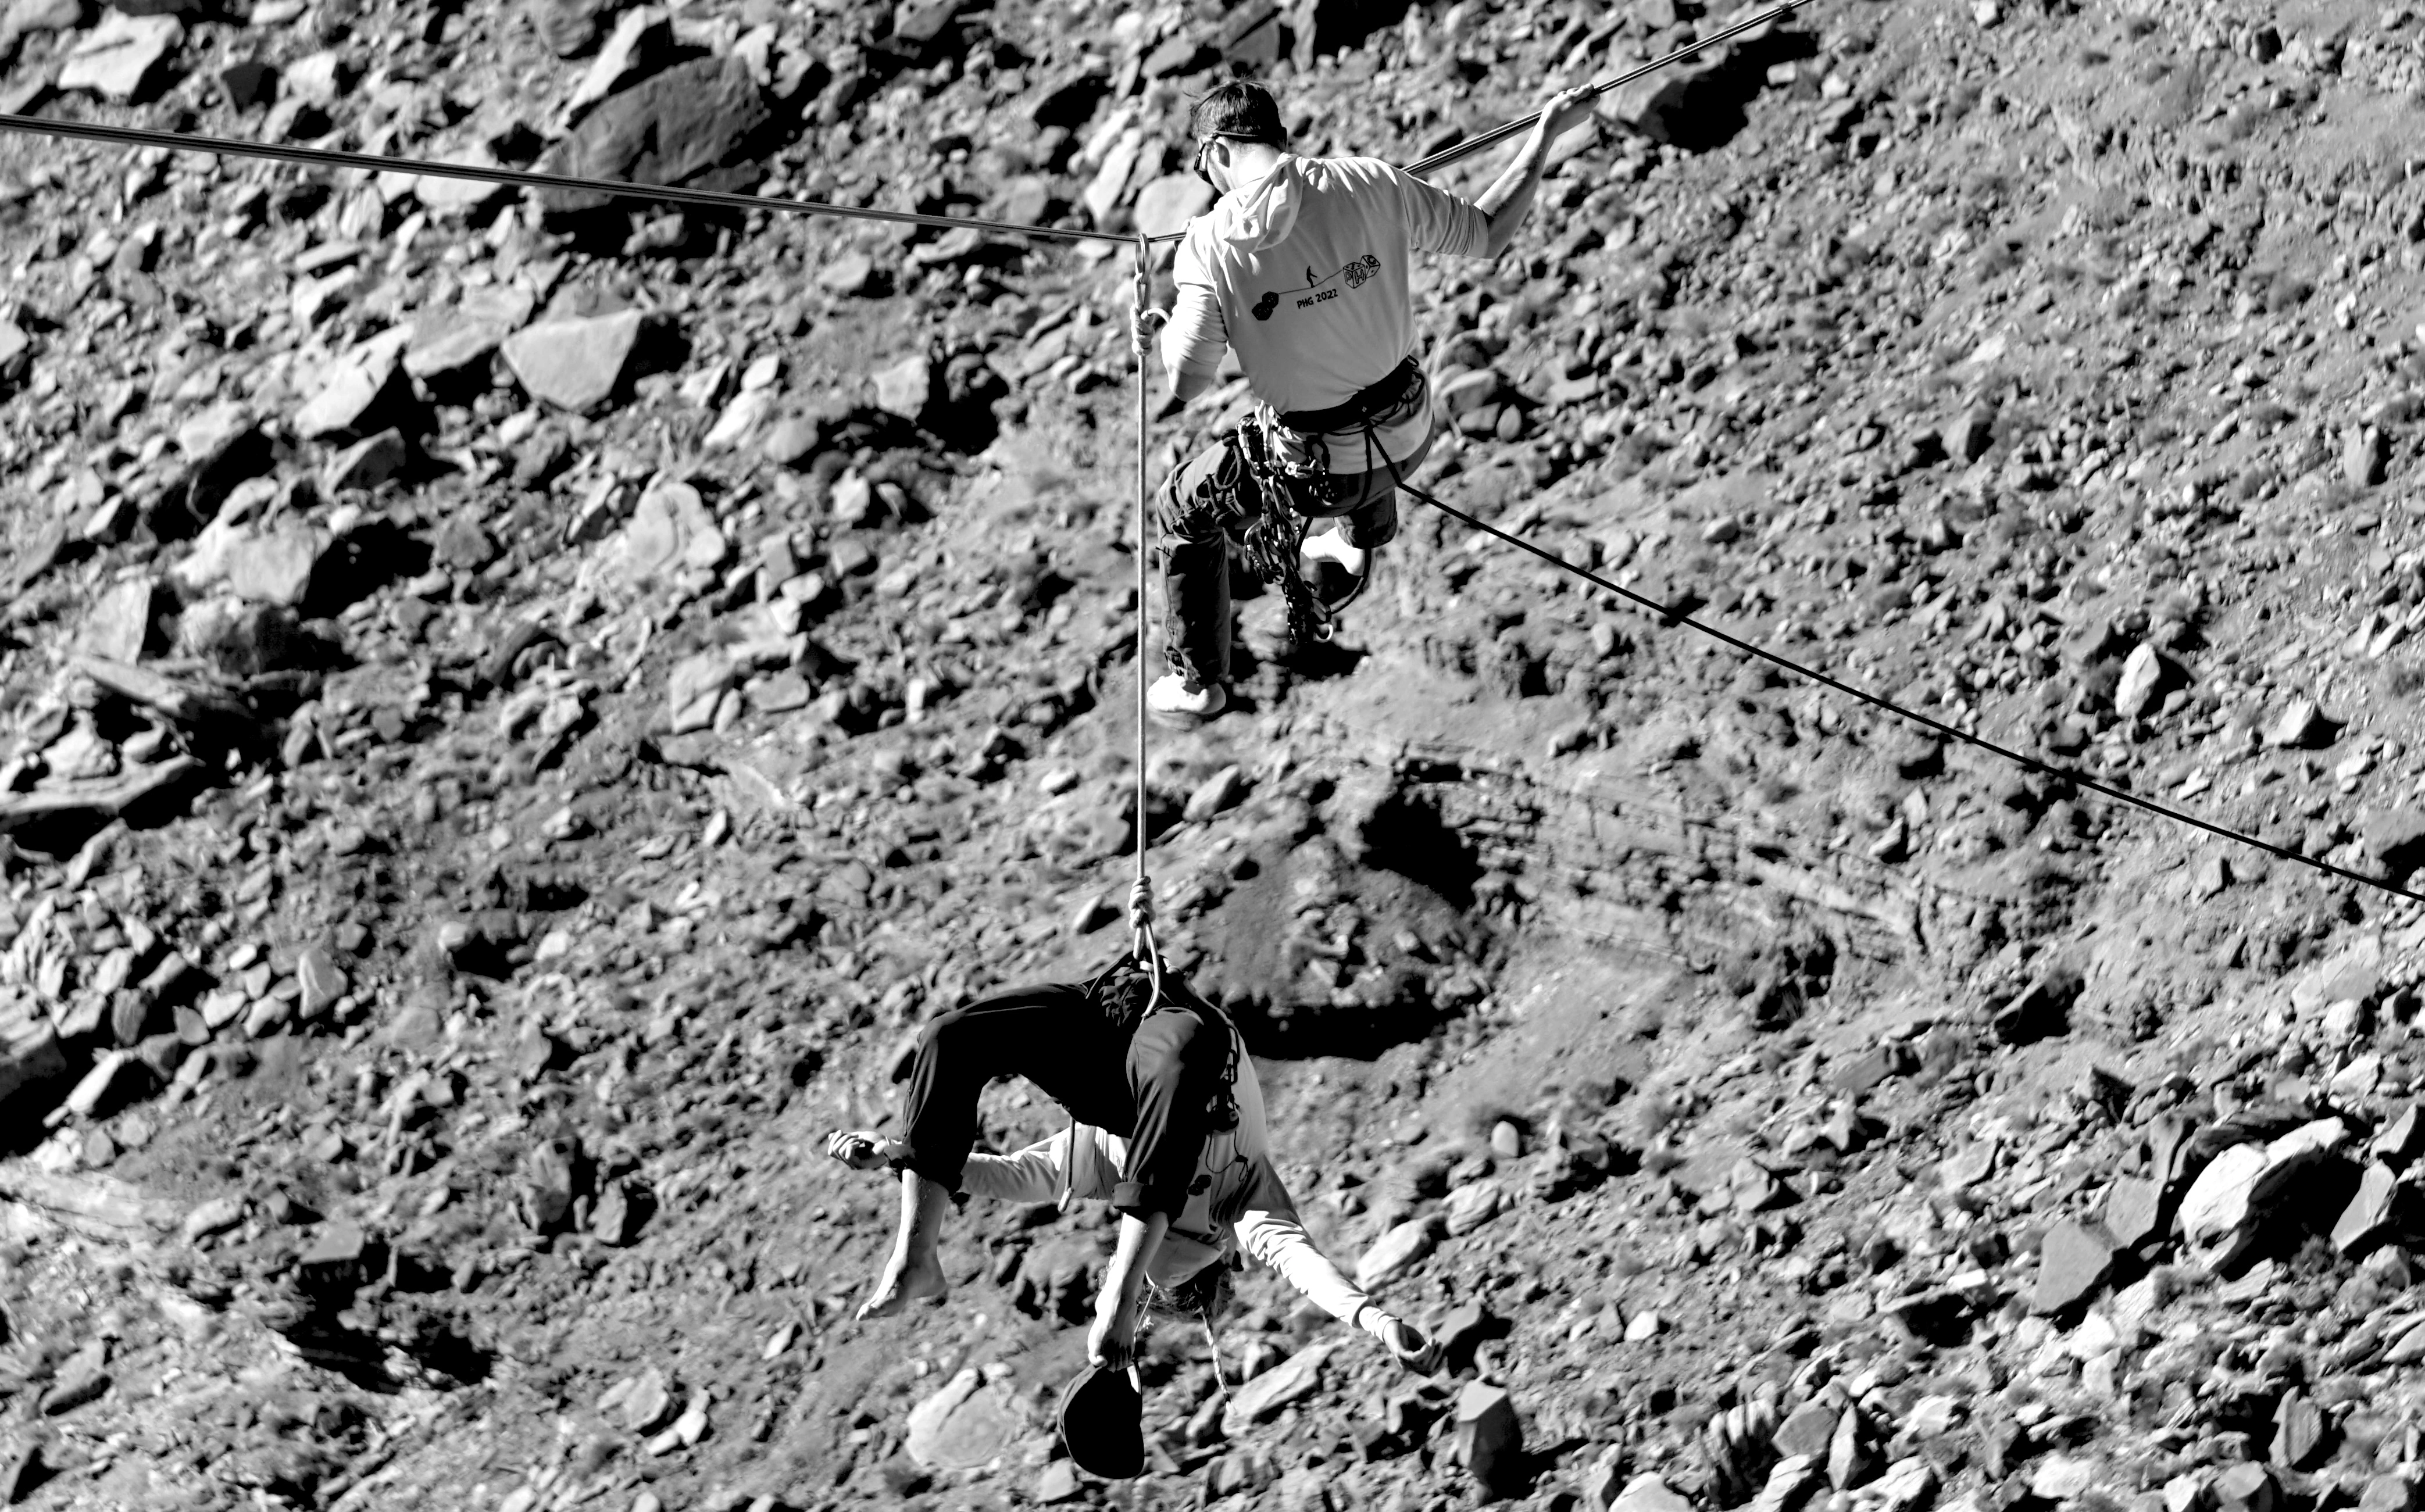
Last month, Raven Sutton (raventsutton on Instagram) taught a rescue clinic in Victoria, British Columbia. Beyond helping keep his local community safe however, he took the time to create some resources that can be used by anyone trying to learn highline rescues. The first resource is a rescue pamphlet that he made with Breann Bassler (_well_mend_ on Instagram), who contributed the stellar diagrams of the rescue system. The other resource is a video of his clinic, which I think is (at the time of writing) the most comprehensive video on rescue concepts and edge rescues available to the public. The video was filmed by David O'Brien, who goes by Evolve Media Collective on Instagram.
In preparing for the clinic, Raven consulted with both myself (Philip Queen) and Clayton Underwood. Clayton and I are both Senior Instructors for the ISA Riggers Cert, which tests edge rescues as part of the certification exam. We also teach highline rescues as part of Paradise Highline Community's ISA Prep/Advanced Rigging course. While Clayton and I were able to provide a lot of help, we did not have editorial control over the content. I do not endorse all of the information shared. While Raven did a great job, no live demo is ever going to be perfect. Below I will add some of my main comments and criticisms, with the goal of improving the utility of these resources. The purpose of sharing these is to provide more free resources to the community and help prepare highliners to rescue their friends. Practice anything you learn from these resources close to the ground and with experienced people present to help ensure you keep yourself and your friends safe. As I will mention below, even practicing rescues puts you at risk of experiencing suspension trauma and needs to be handled with safety in mind. If possible, attend an in person clinic to learn these skills from someone experienced and, ideally, certified.
Rescue Pamphlet
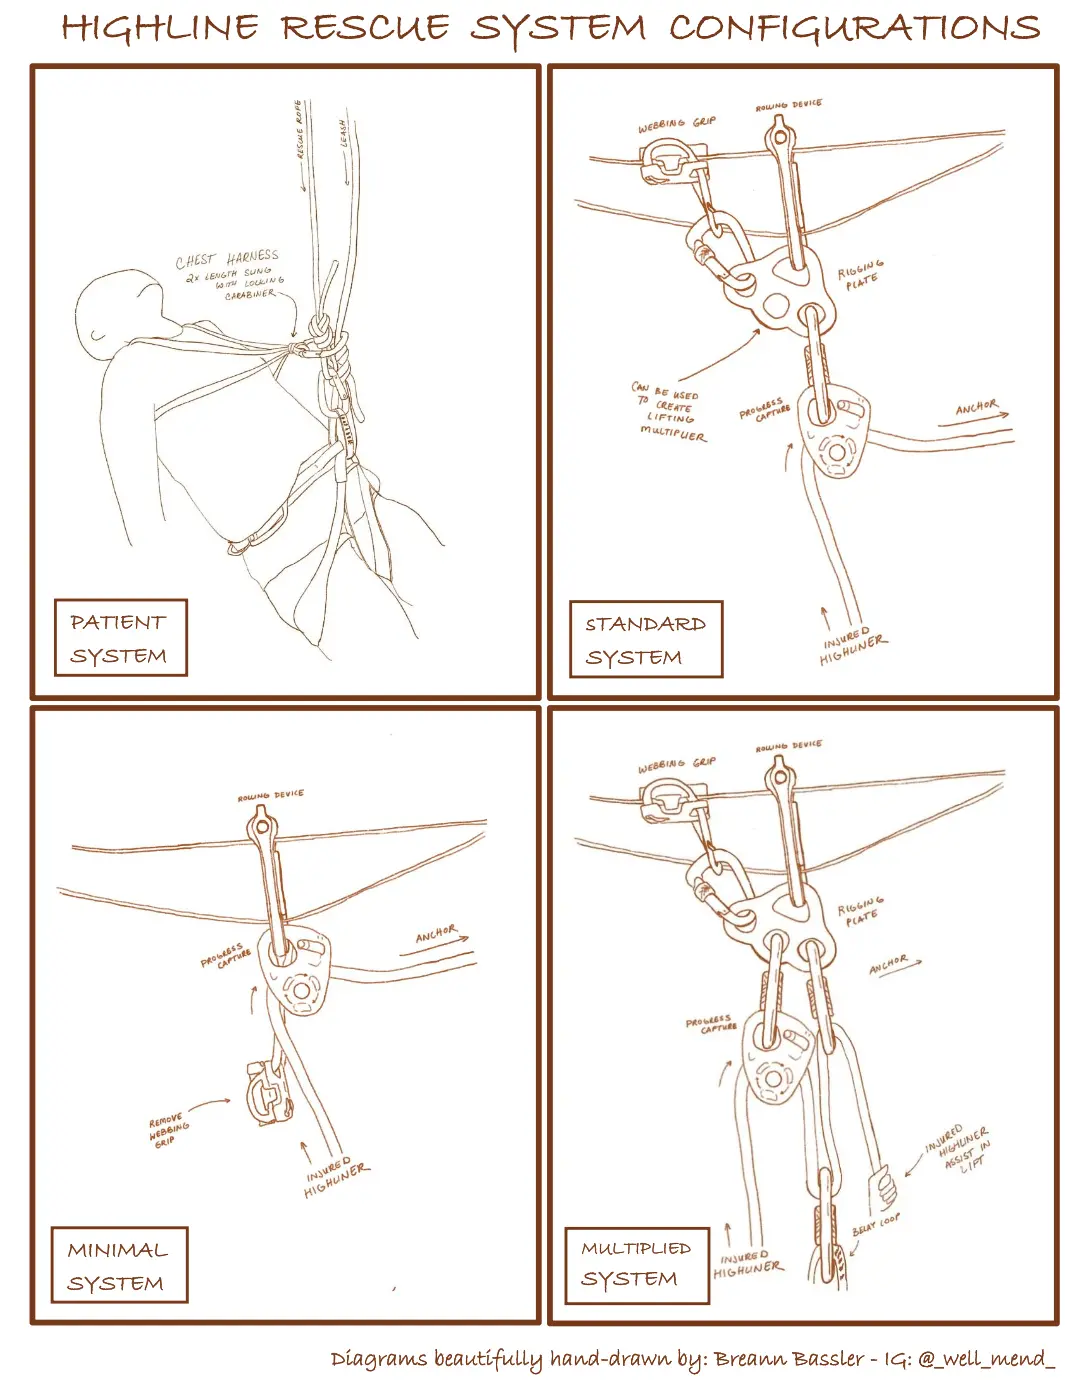
The high quality version in PDF form can be found here: Highline Rescue System Configurations. This version can be printed out and folded into a pamphlet.
The first page of this pamphlet was made by Breann Bassler, and does a great job of showing the rescue system in a few different forms. The first slide shows the setup of a chest harness. It's important to run both the leash and rescue rope through the attachment to the chest harness in order to ensure the chest harness still holds the patient upright after they are lifted off the leash. Ideally, the chest harness is even tighter than pictures, so that the rescuee's head is held more upright, maintaining their airways. The next two slides show a standard and minimal system. The main difference is the presence of a rigging plate and extra connectors for the standard system. The standard system is easier to work with, but the minimal system has the benefit of creating less distance between the patient and the line. If you need to lift the patient up over the cliff edge at the end of the rescue, every inch of makes the lift much easier. The final slide shows a multiplier system made with two extra carabiners, although it is more efficient if you can replace one or both carabiners with line slides. This multiplied system is very useful if you don't have enough hands on the cliff edge to lift the patient. The added multiplication can help the group on the edge lift, or can be used to to let the rescuer lift the patient directly without help from the edge. This particular multiplication system is good because it allows the rescuer to make a foot loop and stand up with their body weight to lift, which is the most efficient hauling stance when hanging. It is also easy to add during the hauling process if you find you cannot lift the patient. However, there is an even simpler system that allows you to get the same multiplication factor with less gear. To do this, fix the end of the rope directly to the rigging plate, pass it through the patient's roller on their belay loop, and then come back up and through the progress capture. This works very well, but can't be added once the patient is partially lifted, so you need to have the foresight to know you will need help lifting.
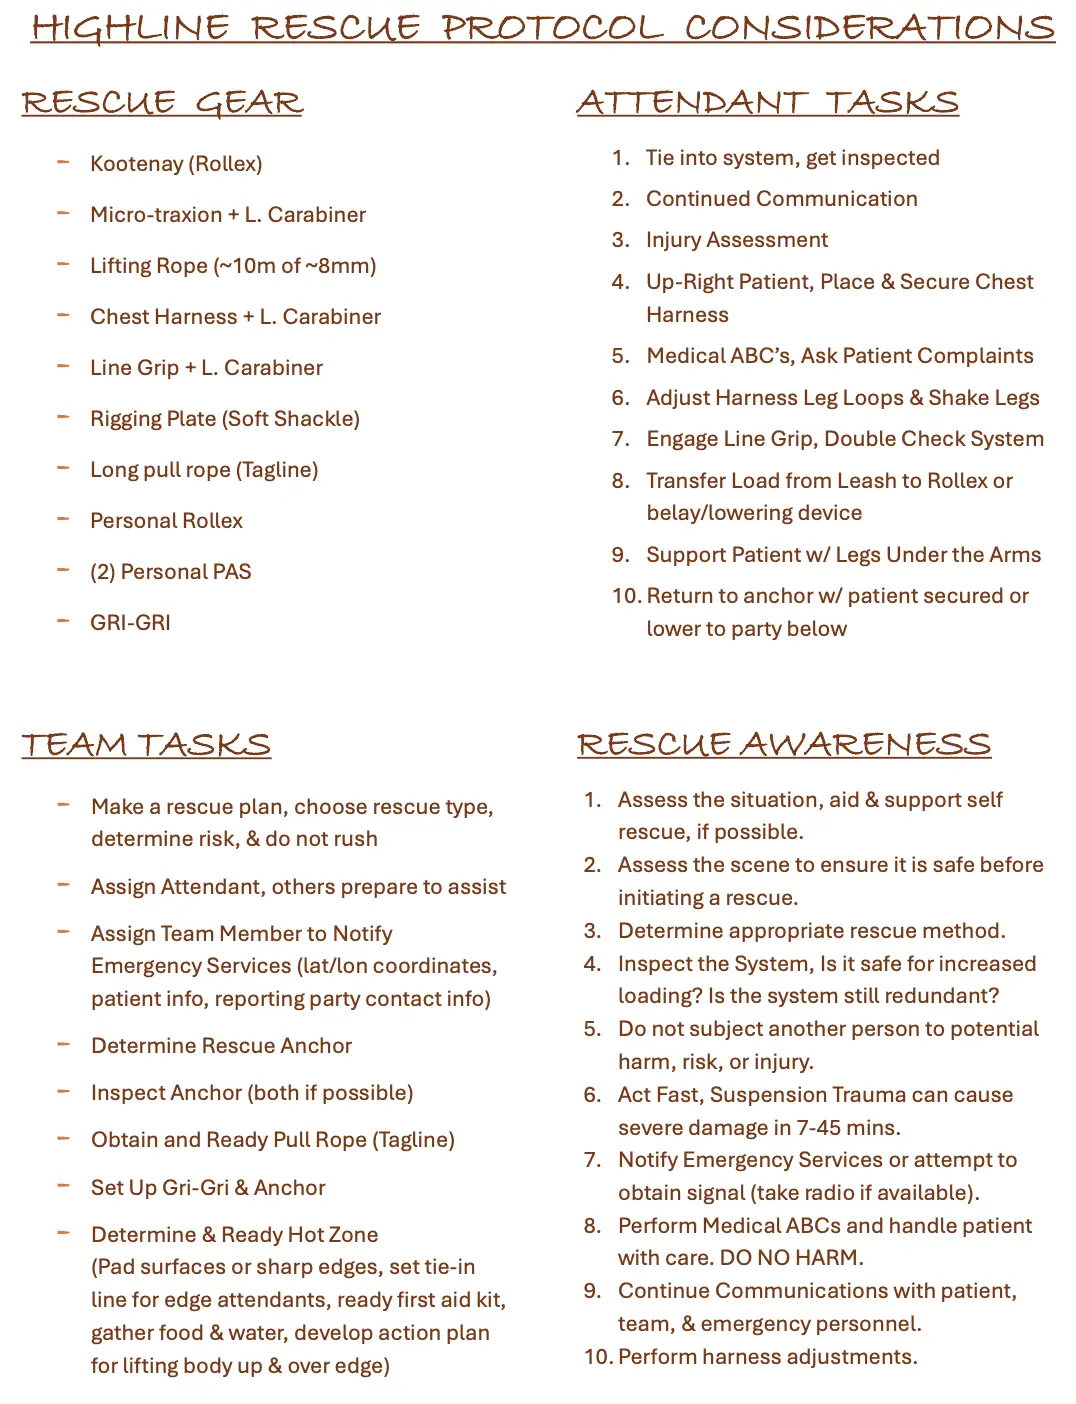
The second page of the pamphlet was written by Raven. It starts with a gear list that is mostly correct, although I would add that while a GriGri is helpful to capture progress while pulling the patient in, it's not strictly necessary. For a chest harness it's good to use either 2 single length slings girth hitched together, or one double length sling with an overhand knot in the middle. Nylon slings are better than dyneema ones because they have more surface area and bite into the skin less. For the pull rope, it's best to have at least half the length of the gap, abut if the far side anchor is hard to access from the home side you may need the full gap's length of line. The next section, attendant tasks, are what to do as the person going out on the line. They are mostly straightforward, although it's worth mentioning that between steps 8 and 10 it is also necessary to remove the webbing grip to be able to be pulled in. If the edge crew is using progress capture, they will need to release slack to allow you to remove the grip. This is a common hurdle for new rescuers, who often feel the rope tighten as they ask to get pulled in, but aren't able to move. The next slide, team tasks, is for everyone remaining at the anchors. When I teach and grade rescues, I always recommend that the rescuer going out on the line explicitly delegate someone to call emergency services (first) and then someone on the edge to manage the edge system (the attendant). This explicit delegation helps prevent the dispersed responsibility you get in groups. I would also mention that its not strictly necessary to have a rescue anchor. If you cannot find a separate anchor, either use your masterpoint from the highline anchor or pull the patient in without progress capture. The final slide is rescue awareness, and my only comment here is that suspension trauma can cause death over the time periods mentioned, not just severe damage. This high risk of fatalities on a short time scale is part of why it's so important to learn, practice, and be prepared to perform rescues.
Rescue Clinic Video
Suspension Trauma / Harness Hang Syndrome
The biggest problem with the video, and the only real safety relevant issue, is the downplaying of how serious suspension trauma or harness hang syndrome are. Suspension trauma can lead to DEATH in as little as 6 minutes (not 7), not just damage. This was never mentioned, but it's the core reason practicing efficient rescues is so important.
The mechanism is also a little different than Raven mentioned. The theory that pooling blood gathers toxins that can kill you when they are eventually released back into circulation (reflow syndrome) was the dominant theory for years, but seems to be outdated now. From the research I've done on the recent medical literature, recently confirmed by talking with some local search and rescue members, is that the biggest threat is just passing out (syncope). Being unconscious can obstruct your airways and stop your breathing. So focus on the ABCs, and be very alert for signs of fainting/pre-fainting. The medical recommendations I've seen all focus breathing and fainting, and say to ignore old advice about ensuring slow reintroduction of blood.
Knowing the high risk of death and enough about the causes to recognize important symptoms is crucial while you're practicing rescues. These risks do not disappear just because you are practicing. Always monitor yourself for signs of fainting, and abort the rescue as soon as something feels off. The 6 minute death that serves as a worst case scenario actually occurred during a rescue training (not highline related). Treat rescue practices seriously, and always mind the safety of everyone on the team.
Chest Harness
I don't like the chest harness Raven used in the video. The main issue is that the slings weren't actually fixed to each other at the cross in the back, so they predictably fell apart trying to get the patient's arm through. The other downside is he needed four attachments to the carabiner instead of two. This made it harder on him without serving any real purpose. One double length sling with a knot / two single length slings girthed together will work better and be easy to bring. Also, the chest harness wasn't tight enough in the demo. The head should be lifted enough that it's supported - if it's rocking back badly then the fainting risk is still high. Get the patient as upright as you can in the chest harness, and then support by straddling as Raven showed.
Purpose of the Grip
Because Raven lifted the rescuee in the demo on his own, the video doesn't really show the purpose of using the webbing grip, which is an important component for any system where the edge crew is doing the lifting. When pulling from the edge, the force moves parallel to the line. When the patient is already lifted and on a roller, this pulls them smoothly into the anchor. But before they have been lifted, this pull would cause the patient to drag along the line on their leash, swinging chaotically - a situation we clearly want to avoid. By using a wafer, we can turn this force pulling along the line into a perpendicular force. When the parallel force is resisted by the wafer, the force is redirected through the progress capture and acts to lift the patient. This is the key trick that allows edge rescues to work so well. Understanding the purpose of the wafer is a key to running smooth rescues and solving problems quickly. Messing up by having the wafer on when it shouldn't be (or off when it should be on) is one of the core mistakes I see in people's rescues. This part is definitely worth practicing with.
Lifting Rope
I really like Raven's addition of the "lifting rope" that he introduces here. The idea is to bring a short section of rated rope that will actually support the patient, and join that to the tagline to pull the patient and rescuer in. This allows you to carry only a small section of heavier rope, and use the tagline that should be already at the far anchor to do the pulling. Raven recommends ten meters of rope for this. I think that amount would be handy if you need to lower the patient from an elevated anchor like a high tree anchor, but for most simple cases I think 5m would do. He also recommends using 8mm rope, but I think 7mm cord would work just as well with most progress captures. The only downside I see with this idea is that relying on the tagline for the rescue requires that the tagline was well flaked or coiled, and that the far anchor is easily accessible. If the far anchor isn't accessible, it's better to bring a dedicated rescue rope long enough to get across the line. Although using a lifting rope will still allow you to bring a smaller, lighter cord than you would need to using just one rope for the whole system.
Pulley System Improvements
Raven shows a clever 3:1 pulley system for lifting the patient on your own. The system worked well enough for Raven to do it, but it has two downsides. First it requires pulling up instead of down, which is much more difficult while on the highline. Second it requires more effort to transition into a system the edge crew can help with. The two alternative systems are the 3:1 shown in Breann's drawing, and the 2:1 I described where the rescue rope is attached to the rigging plate. Both of these allow you to pull directly downwards, which is more efficient and lets you add a foot loop to stand into to be able to push harder. They are also easy to convert into edge pulls that still benefit from the multiplication.
Conclusion
Raven and Breann did a great job compiling these resources. Breann's drawings are the clearest depictions of the basic edge rescue system I've seen, boiling down a complex system into one easily graspable page. Raven's written description and demo are the most comprehensive publicly available rescue resources on the internet. It is definitely worth your time to watch the demo and print off a few copies of the pamphlet to keep around and give away. Most of my notes are simple process improvements, but I do want to emphasize that rescues are extremely time sensitive, and being unprepared as a crew can be fatal for yourself or a friend. Learn the systems, practice in low stress situations, and bring the gear so you have it when you need it. Remember to watch yourself and anyone else out on the line for symptoms of fainting, and stop at the first system. Always buddy check both the rescuer and the rescuee before they go out on the line, and make sure the edge crew is personal anchored throughout the process.