Absurdian Technical Report
3km World Record - Thacker Pass, Nevada, USA - October 2024
Note from Philip: The following was a group effort from the team that rigged the 3k World Record in 2024.
We hope that other highliners will benefit from the details and lessons of our rig, just as we benefited from the knowledge that others have shared. This report assumes familiarity with highline rigging and the shower curtain method. This project was made possible by the dedication, gear, expertise, and passion of everyone involved. We extend our deepest gratitude to the individuals listed below, whose collective efforts turned our dream into reality. Positivity, love, and mutual support were fundamental to our success. Finally, a special thank you to the team behind Ananatopisme (2.7 km)1, the previous world record line, for generously sharing their technical insights and inspiring us.
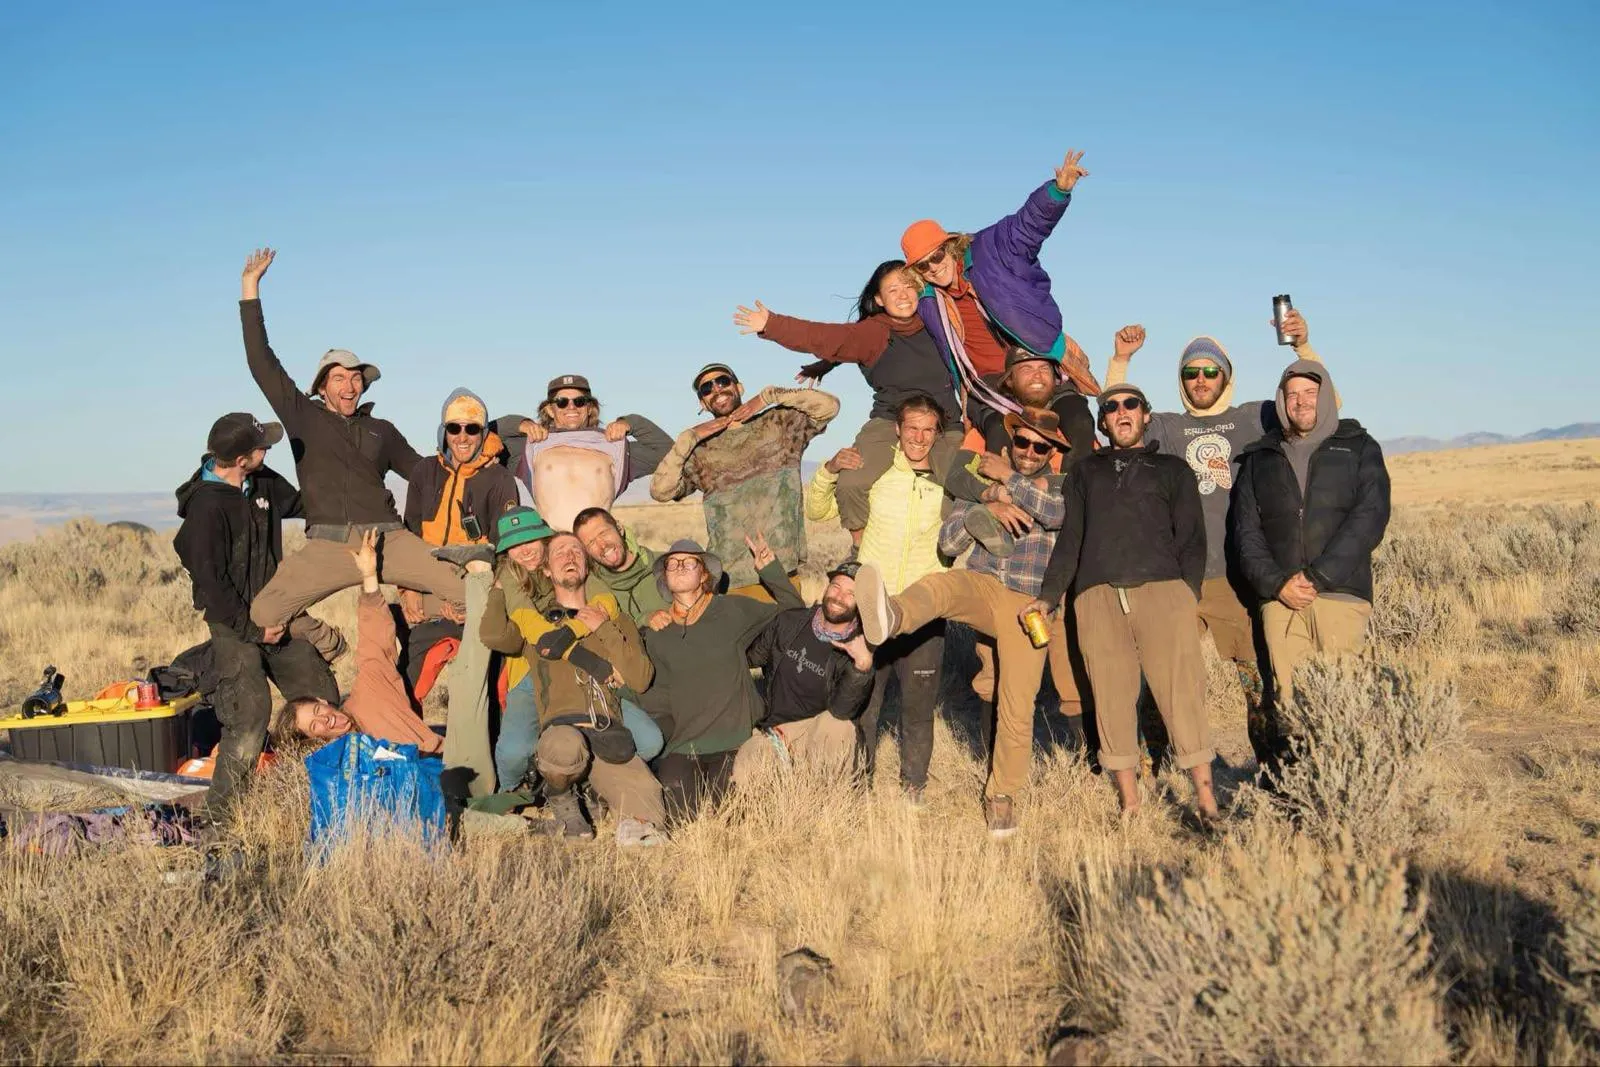
Team
Athletes and Riggers
Photo and Video: Michael Rasmussen
The Spot
Thacker Pass is the sacred land of the Paiute and Shoshone peoples. It supports a vibrant grassland steppe ecosystem of bighorn sheep, chuckers, mountain lions, and other large animals. It is managed by the Bureau of Land Management (BLM) and is actively used to graze cattle herds. During the project, a controversial lithium mine was under development across the highway from the highline. You can learn about efforts to oppose it from the indigenous communities and the mine itself from the company website. We reached out to the indigenous community organizations we found online shortly before the project, but got no response.
This spot was chosen because it provided a gently sloping bowl composed mostly of sagebrush and scattered boulders. During our search, we prioritized terrain that would enable us to lay down the webbing in case of emergency and easily access the land underneath the line for rigging and potential rescues. Unfortunately, the terrain wasn't so gentle we could lay the webbing on the ground for the rig.
Elevation Profile and Topo
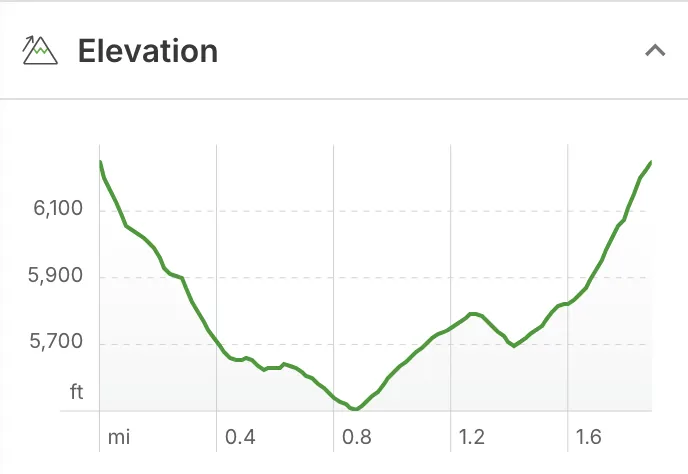
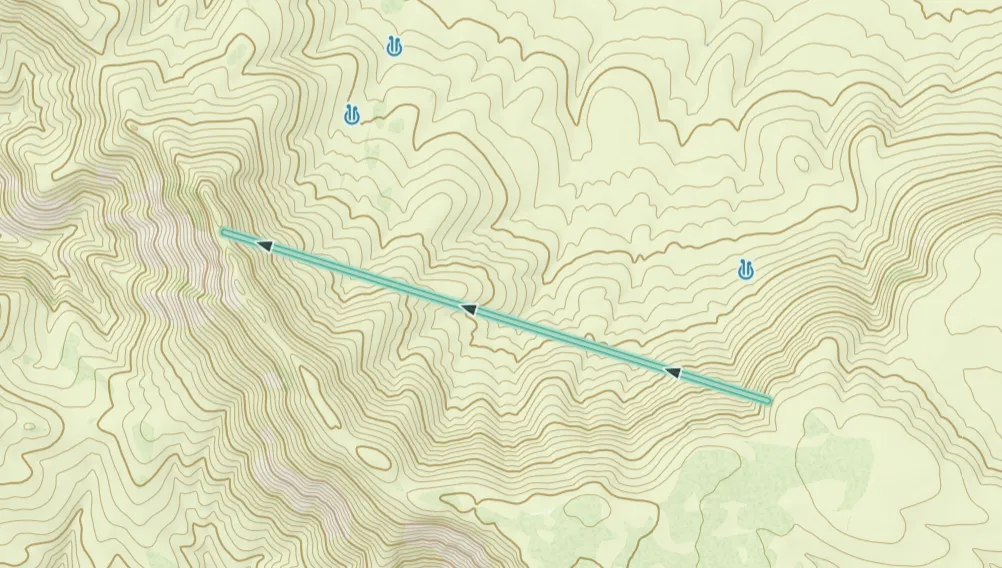
The anchor was 227m above the lowest point on the ground below the line according to the line in GaiaGPS. We expected about 100m of sag in the middle. Considering the distance, the line was on level. One anchor was 6,243 ft (1903m) in elevation, and the other was 6,230 ft (1899m).
This spot had convenient camping close to the home anchor. The ridge was remote enough that our presence didn't raise any concerns, and the only visitors we encountered were a few groups of hunters.
Driving to the remote location was challenging. The approach required 9 miles (15km) of difficult off-road driving over rocky terrain. High clearance and good traction were required. 3 cars couldn't make it to the camp and had to be stored at the beginning of the off-road section. This included one travel trailer. Several teammates had to adjust their camping situation on the fly. Unfortunately one oil pan was cracked along the road and required a temporary patch with epoxy to be driven to the nearest shop.
One unexpected advantage of the location was a weather station within eyesight, just half a mile from camp. This proved invaluable for real-time weather forecasting and monitoring.
Scouting
Danny Schlitt first noticed the region while driving from Bend, OR to Las Vegas, NV in February 2024 and later identified the gap at Thacker Pass using satellite and topographic maps. In May, Danny Schlitt, Alexandra Witter, Alex Bowersox, and Dayoung Cheong scouted the line in person. In June, Cheryll and Steve Glotfelty scouted the road that enabled us to establish camp by the anchors.
Project Organization
Vibe
Have a good time highlining with friends and see what we're capable of! How big can we rig while staying safe and being efficient? How far can we walk or maybe even send? Respect, shared responsibility, and stoke were foundations of the project.
Planning Schedule
For six months leading up to the project, we held monthly video calls, increasing their frequency as the start date approached. To stay efficient, we split into smaller teams, each handling different aspects of planning. There was no single leader—decisions were made collectively, with individuals naturally stepping into roles of responsibility. Most of our coordination happened on Discord, where dedicated channels kept discussions organized while remaining accessible to the whole crew.
On-Site Pacing
To avoid rigging burnout, we set generous timeframes for each task and kept a (mostly) structured 8 AM to 5 PM workday. Without a shared meal system, we made sure everyone had time to cook their own dinner. Each night, we gathered around the fire for an 8 PM meeting, keeping everyone aligned and the stoke high.
The Line
Webbing
The majority of the webbing was Silk 99 (Balance Community). The high MBS (40 kN) and low weight (19g/m) were crucial for this rig.
We had 300m+ of high tech webbing we could hold with a line grip on both sides of the line. The grippable high tech webbing was mostly Spider Silk MK5. There was one segment of Spider Silk MK3 in the main line. These segments were mostly backed up with Spider Silk MK5, or MK3 (Balance Community). In the backup there was also some Sky Diamond (Slack Inov') and Dyneemite Pro (raed slacklines).
The total weight of the webbing and connections in the air was 126kg (277.7lbs).
Weakest Link
- Main line 33.2kn: the sewn loop of Spider Silk MK3
- Backup line 25.6kn: the Spider Silk MK3 in a Mighty Lock
The peak tension on the highline was 19.2 kN which was 58% of the line's MBS, not even a 2:1 safety ratio. Our goal was to keep the line below 12 kN, so we are going to improve our systems next time.
Lessons from the high forces reached:
- Formal anchor watches the entire time the line is rigged, including at night
- Improve the tensioning/detensioning system so we can quickly and safely adjust tension in response to the wind
- Use stronger webbing if available
Connections
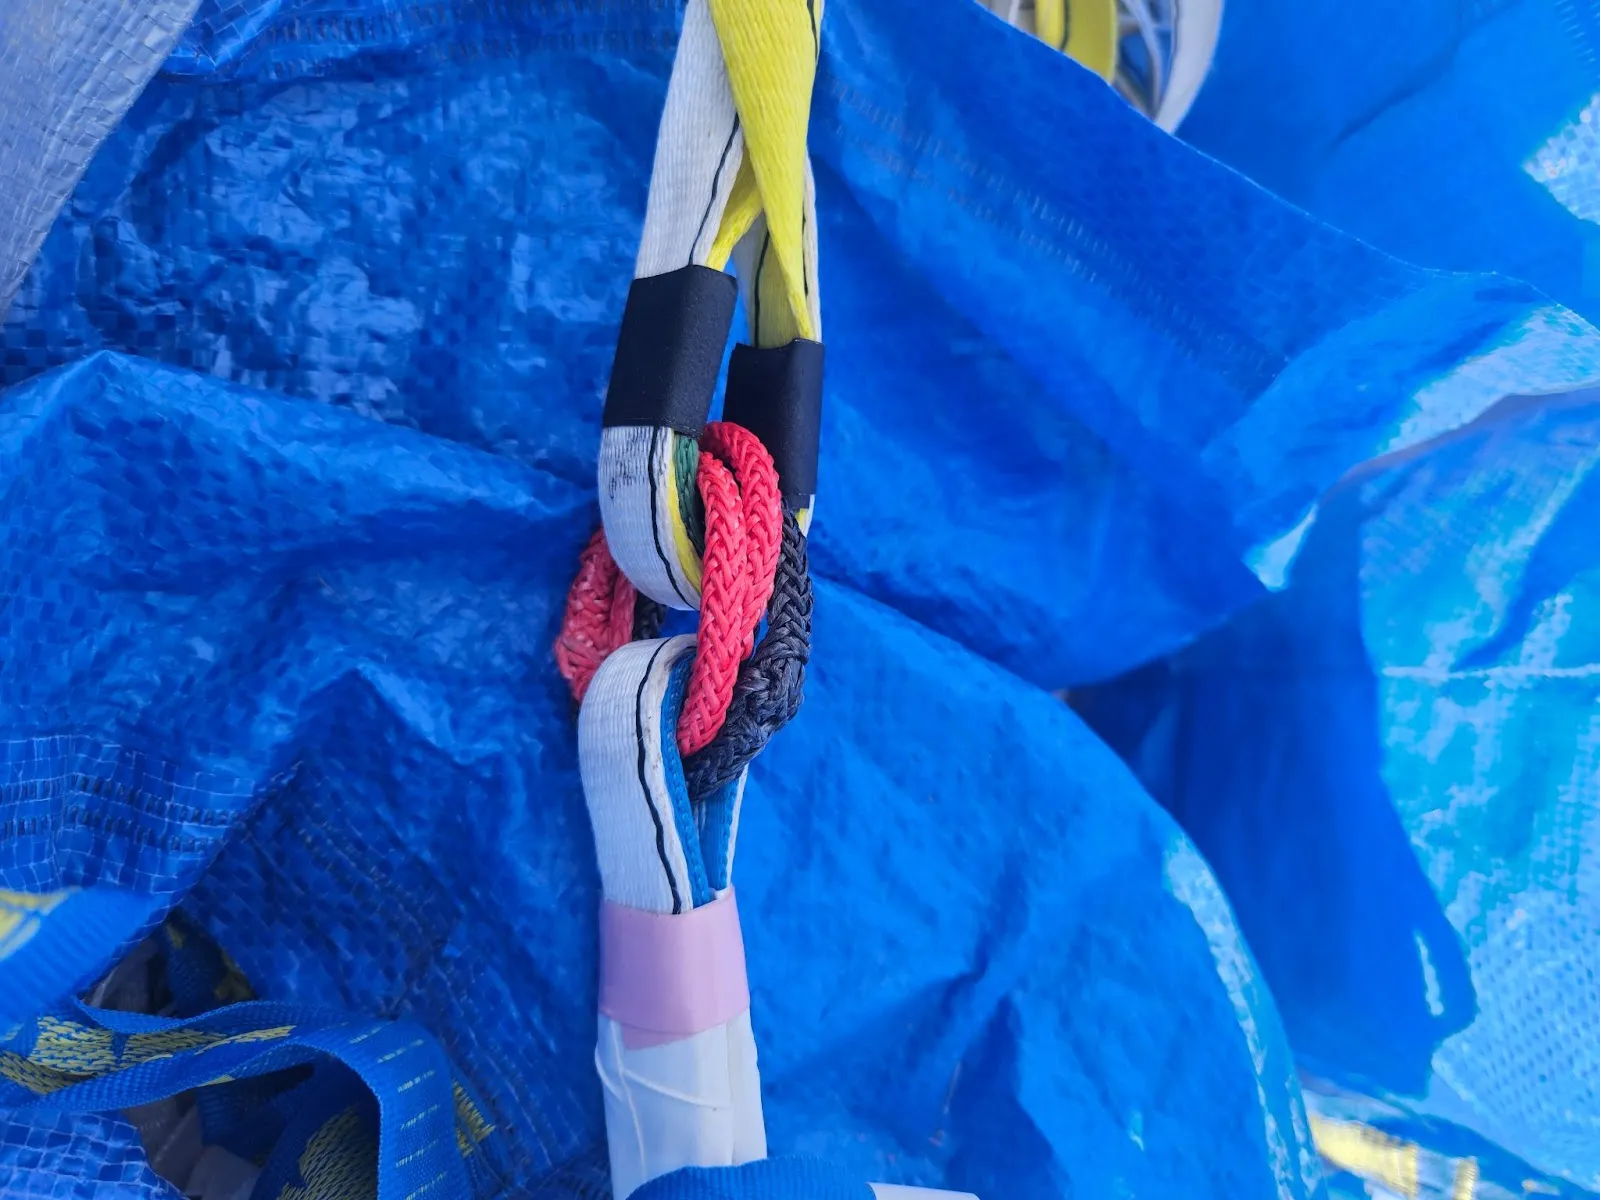
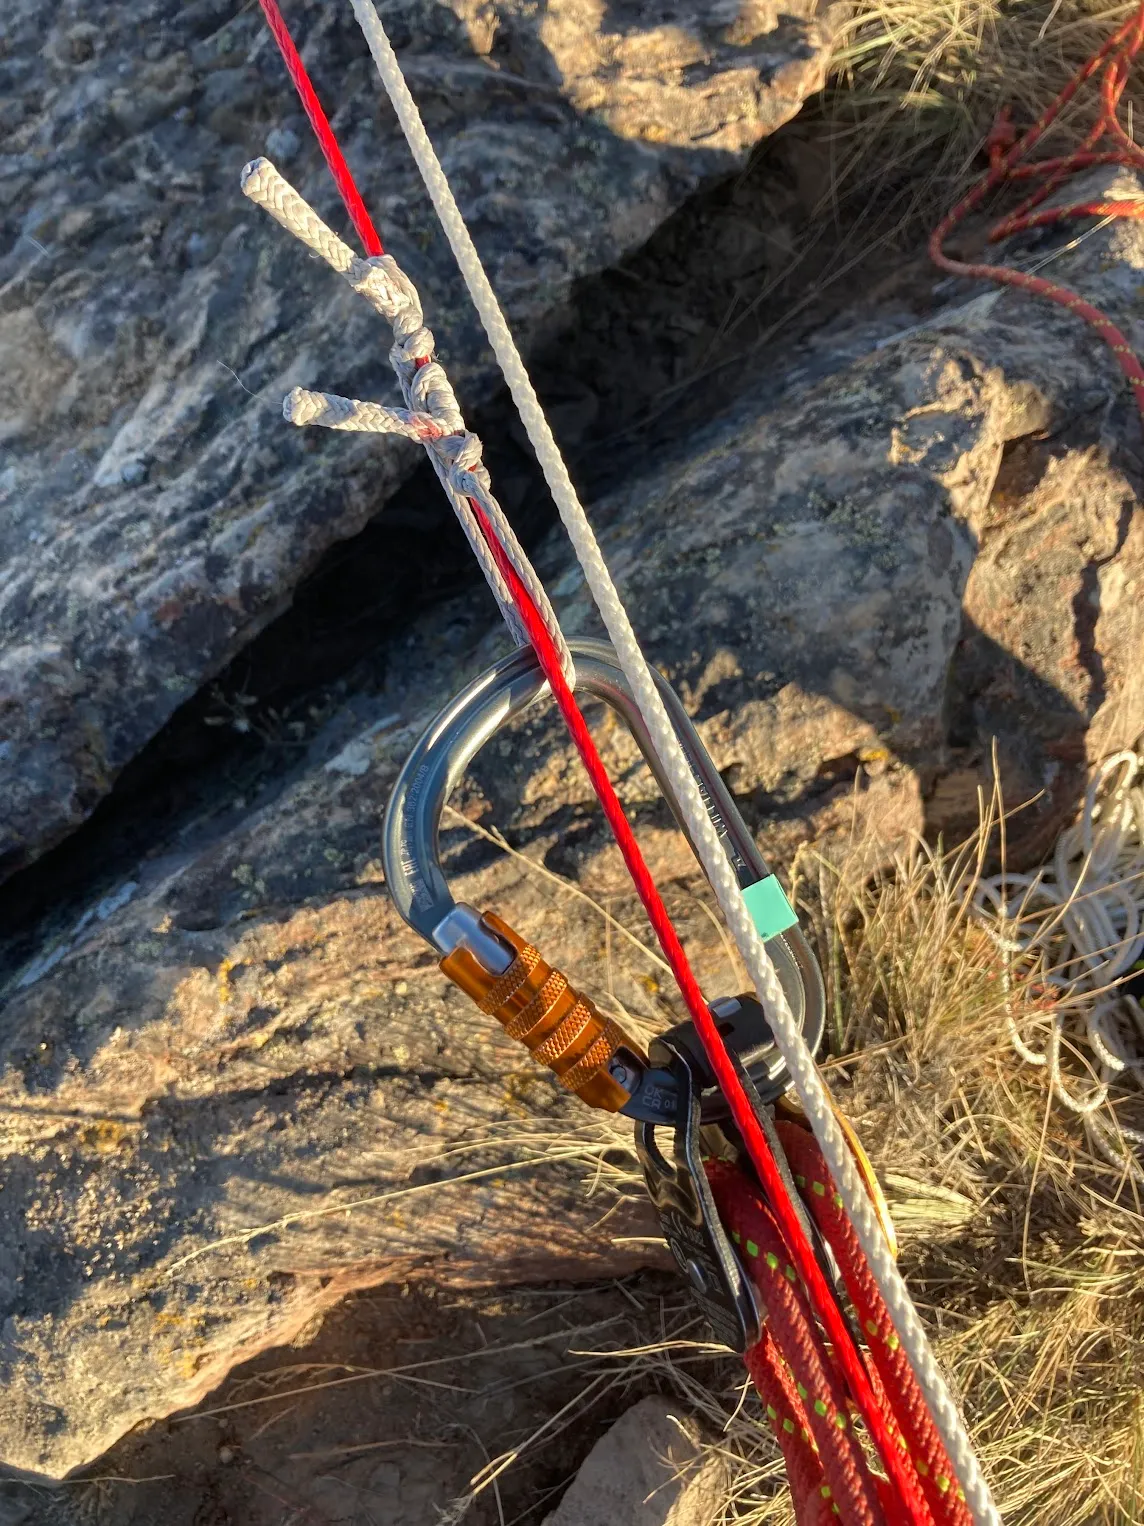
All webbing connections were two double wrapped 3mm SK99 grogs through both the main and backup of each segment. Each double wrapped SK99 grog is 39 kN strong and weighs only 4 grams. We chose this method due to its incredible strength to weight ratio, and small volume. No joke, it was hard to tell if you were crossing a connection or a large tape sometimes. Check this instructional slackchat post and this Riggerous Thinking blogpost for more details.
Soft thimbles were put inside the backup loops and taped securely with tape. Most backup loops on the silk 99 were naked. Then the backup loops were put inside the main and taped securely again. The grogs went through these loops and rested on the soft thimbles. Soft thimbles are necessary to maintain strength in soft on soft connections and especially important for small diameter amsteel grogs.
Extenders
All extenders were Silk 99 attached with grogs. Most of the loops were naked with soft thimbles. Grogging the extenders on with soft thimbles increased the strength compared to girth hitch connections. It is the recommended way to attach extenders to Silk 99, girth hitches are not strong enough. This extender connection method enabled us to add more extenders if necessary. While we did have 1 double tight section, we didn't correct it during the short window the line was up.
Tapes
2in Gaffer tape with 2 in wide fiber tape on top, in 8-12m increments. Sliding on main. We used gaffer tape due to its good adhesion, and the fiber tape on top for strength. The combination helped ensure every tape stayed in place and was strong enough to hold in the wind.
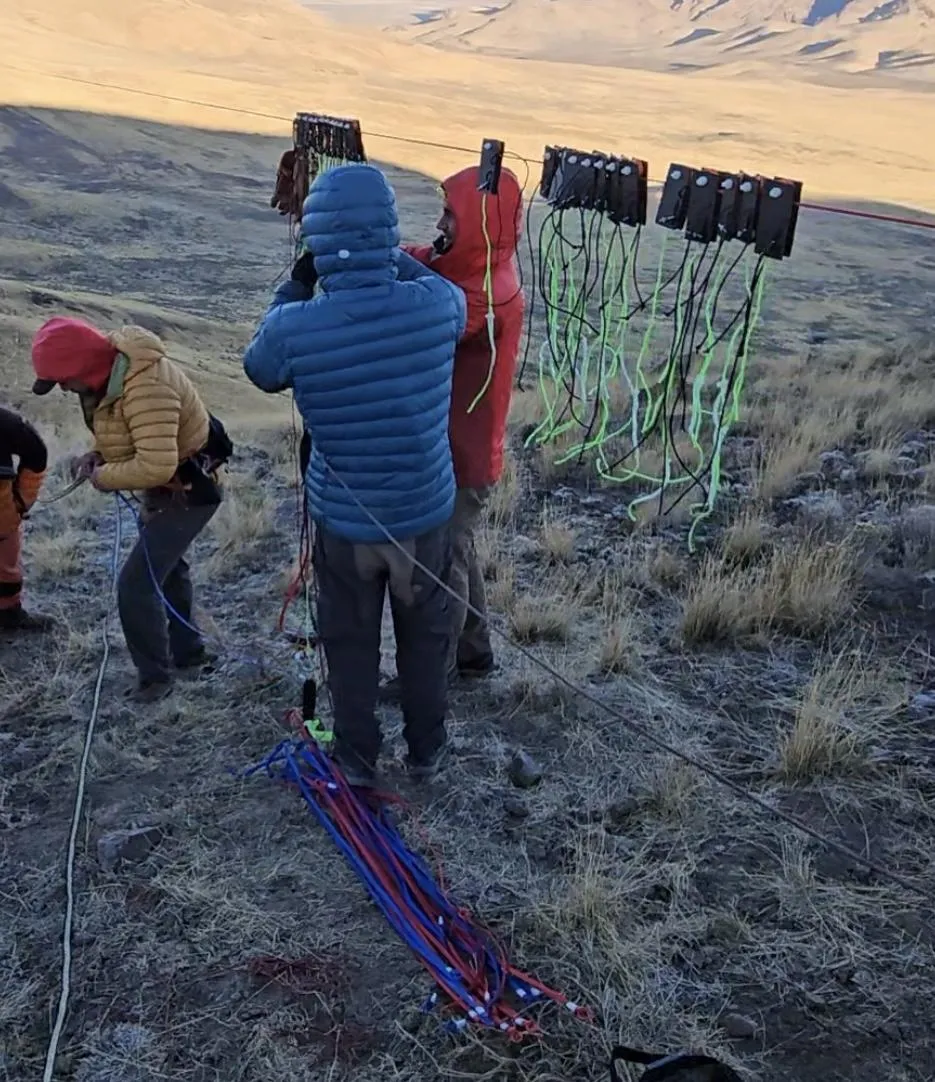
Webbing Management
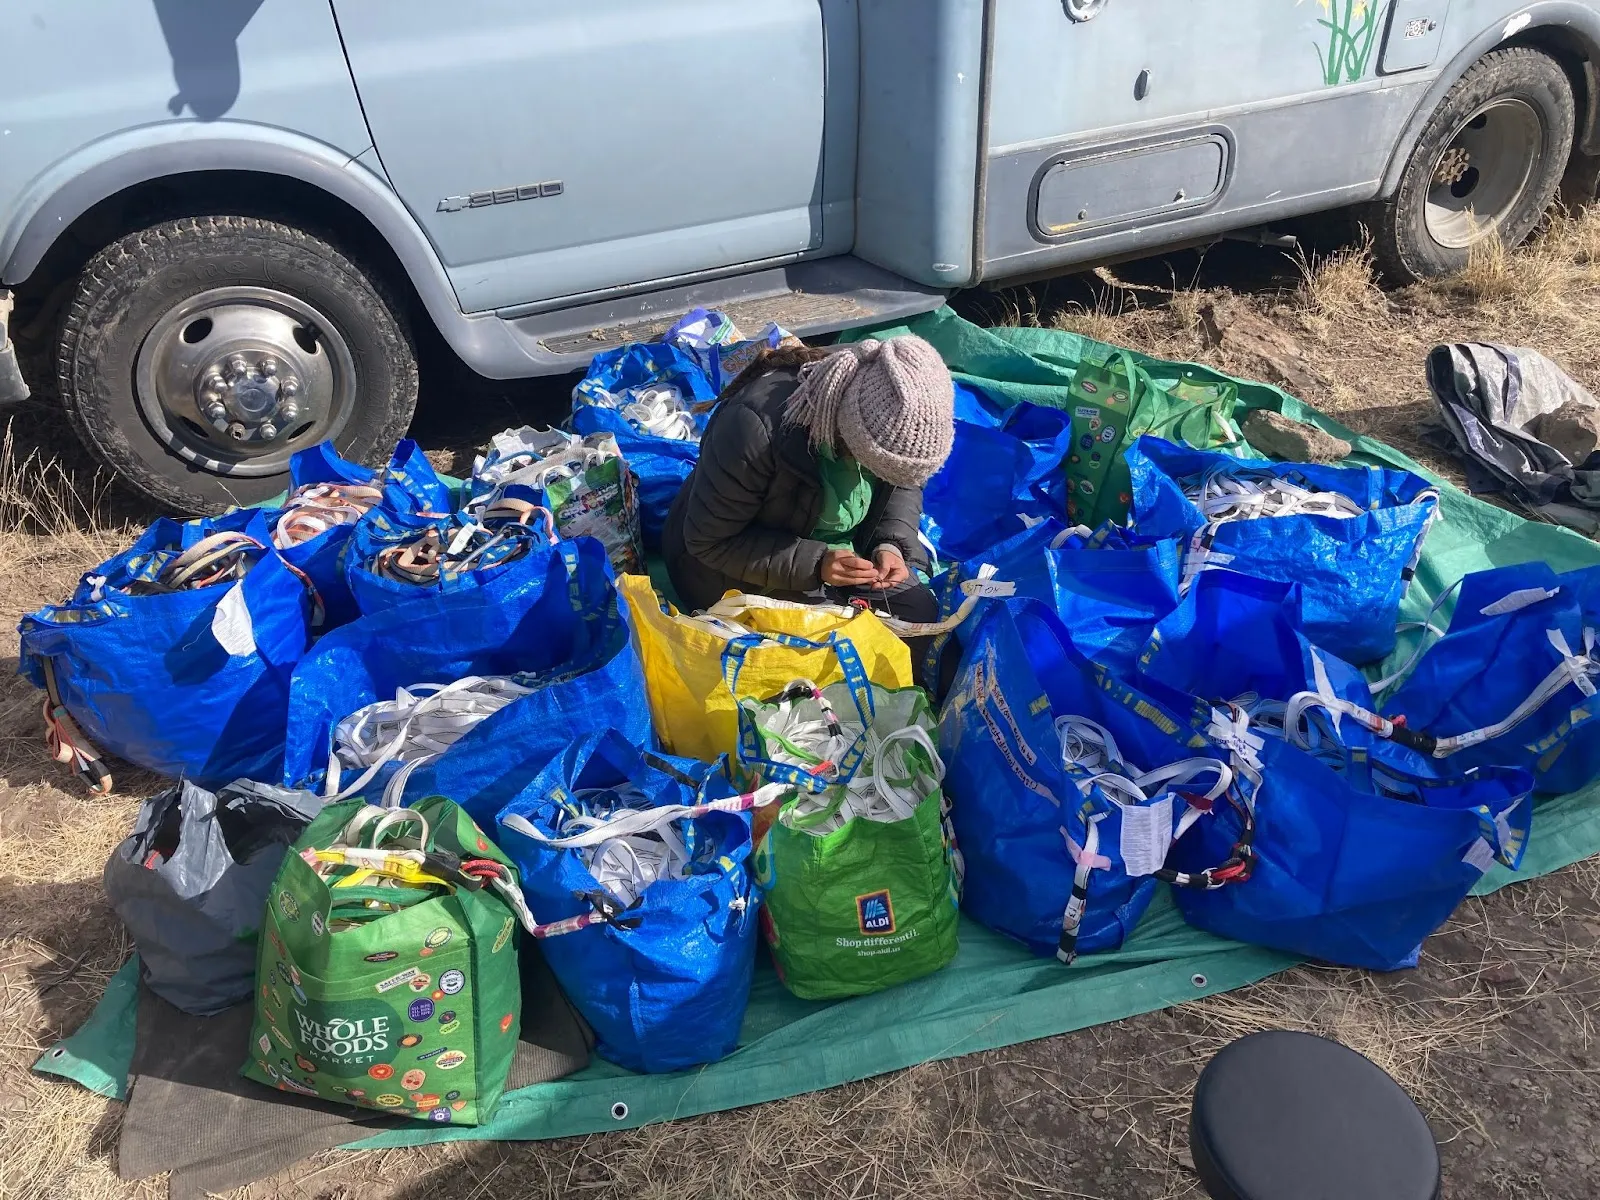
We had about 30 bags with about 100 meters of webbing flaked into each. The ends of the webbing were left outside the IKEA bags and taped to the side of the bag with the main and backup labeled with tape. Some bags were connected beforehand in about 500 meter sections and transported to a tent by the home anchor. We had issues with the tape holding the ends flat falling off, allowing the ends to move freely and introducing twists into the line. Next time we would tape the ends to the handle of the bag instead as that seems more secure.
We estimate about 6 people on average spent most of four days inspecting, pairing pieces, taping, flaking and connecting. Some main and backup pairs were owned by one person while others weren't. Keeping track of the webbing required a detailed spreadsheet. While we were attentive to the details of webbing lengths, we still ended up with one double tight segment.
Our webbing preparation was significantly different from the Ananatopisme line where the mains and backups were sewn together before the team got on site. Future projects will find their time to prepare the webbing will vary and depend on the number of webbing owners and the amount of preparation before reaching the site.
Anchors
Plate Anchor System
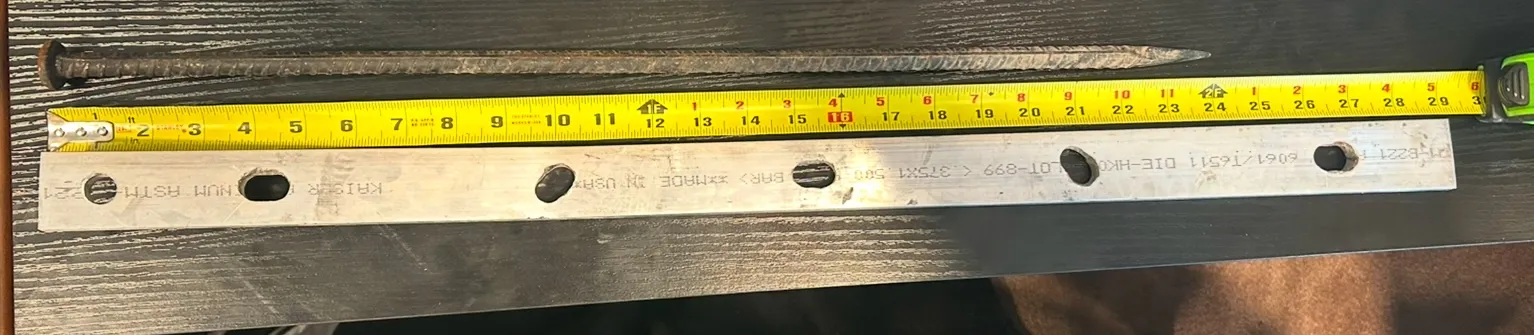
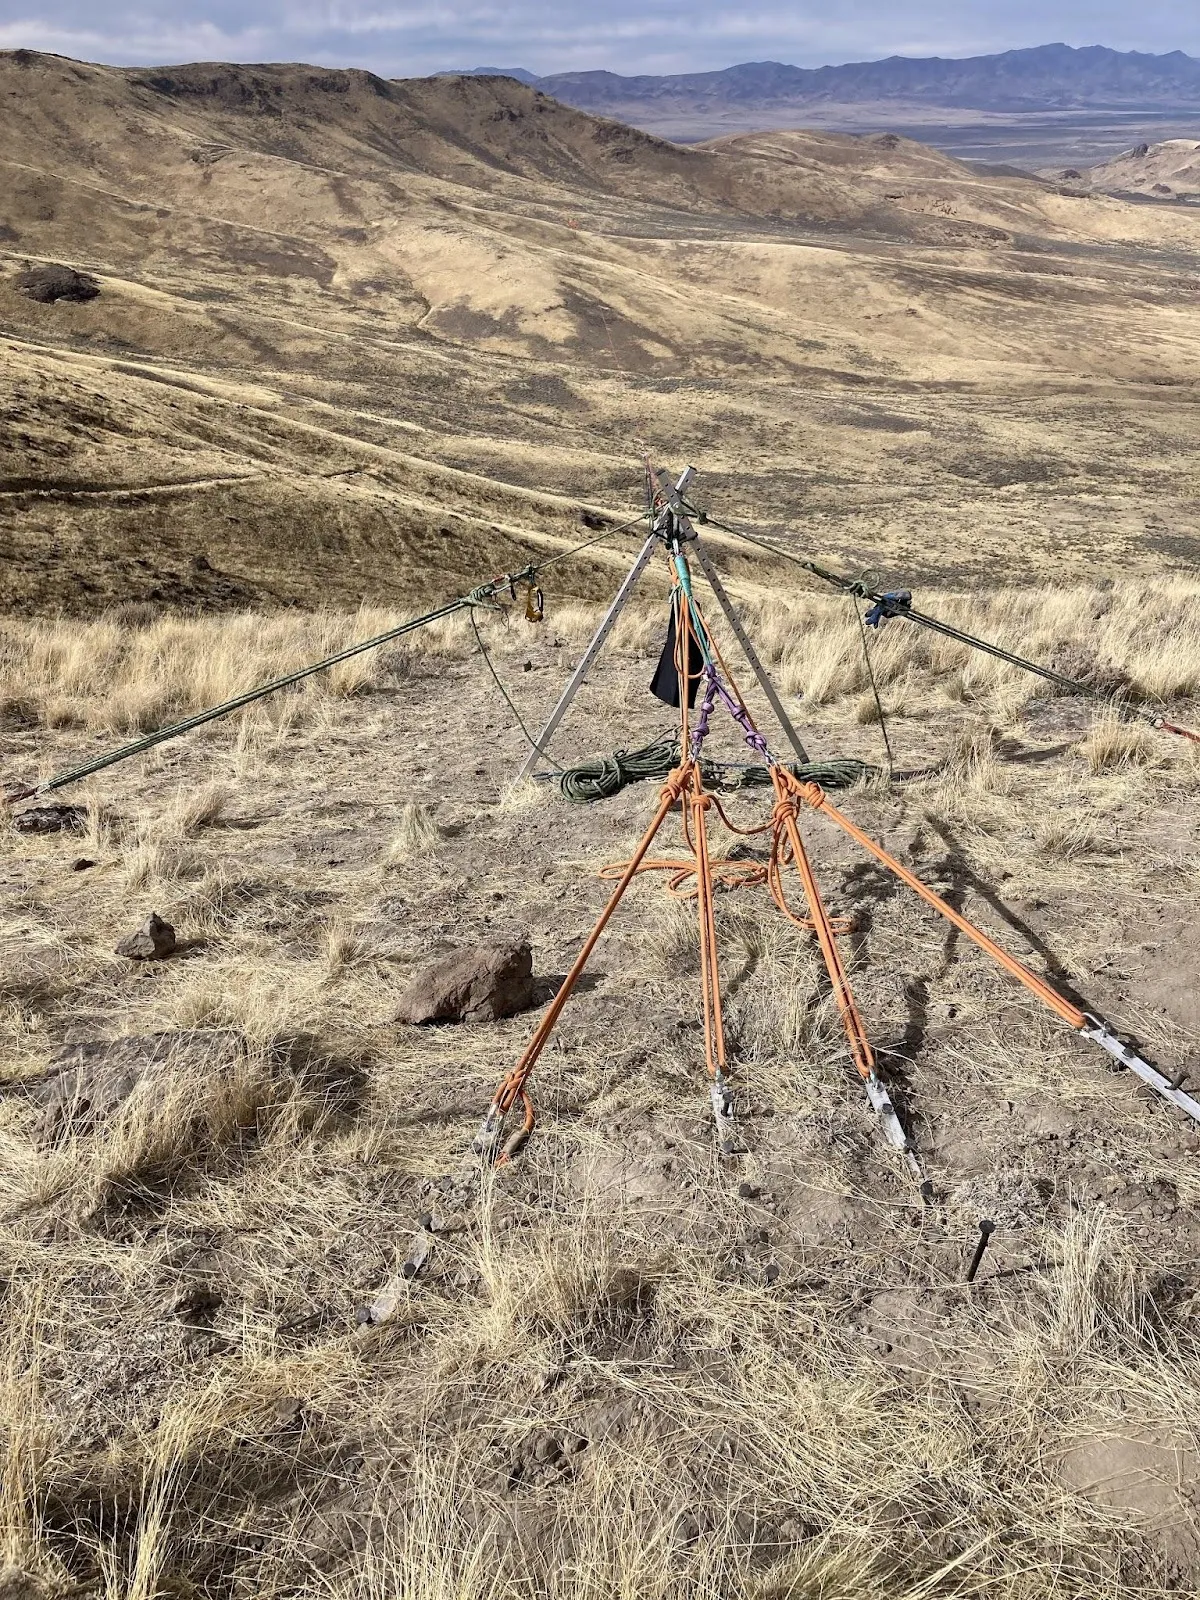
Logan Henning provided a plate and rebar stake anchor system. A single plate was a flat, rectangular aluminum bar with 6 holes that allowed 24 inch long, ½” rebar stakes to be driven through. The holes for the rebar stakes were pre-drilled with ½” bits so the stakes would go in easily and pass through the rocks in the soil. A single plate was estimated to have a pullout strength of 12 kN. Onsite tests showed 12.8, 15, and 16 kN. The density of the soil and presence of rocks majorly impacts the strength of the plates.
Installation: When installing, make sure the drill bit goes deeper than the rebar will, otherwise the tip will bend and be a menace to pull out. Also do not need to pound very hard even with rocky soil because of the predrill. If you find yourself pounding hard, good luck getting the anchors out! We had to use a 45:1 (raed 5:1 and 9:1 stacked) on a hang frame to get some of the stakes out from this project and even then one did not come out. It is important to test the stake system onsite because the MBS varies quite a bit by location. Finally, it is recommended to plan for extra drill bits in case you get one stuck by mistake. It isn't a beginner drill. The mixed soil combined with the depth of the holes can require more confidence and skills from the driller.
Note: when “MBS” is reached, these will already have stuck out significantly from the ground. The anchor will pull out of the ground about 8 inches before the peak MBS is reached, then force to continue to pull the anchor out decreases. Visually very scary long before there is real danger.
Main Anchor
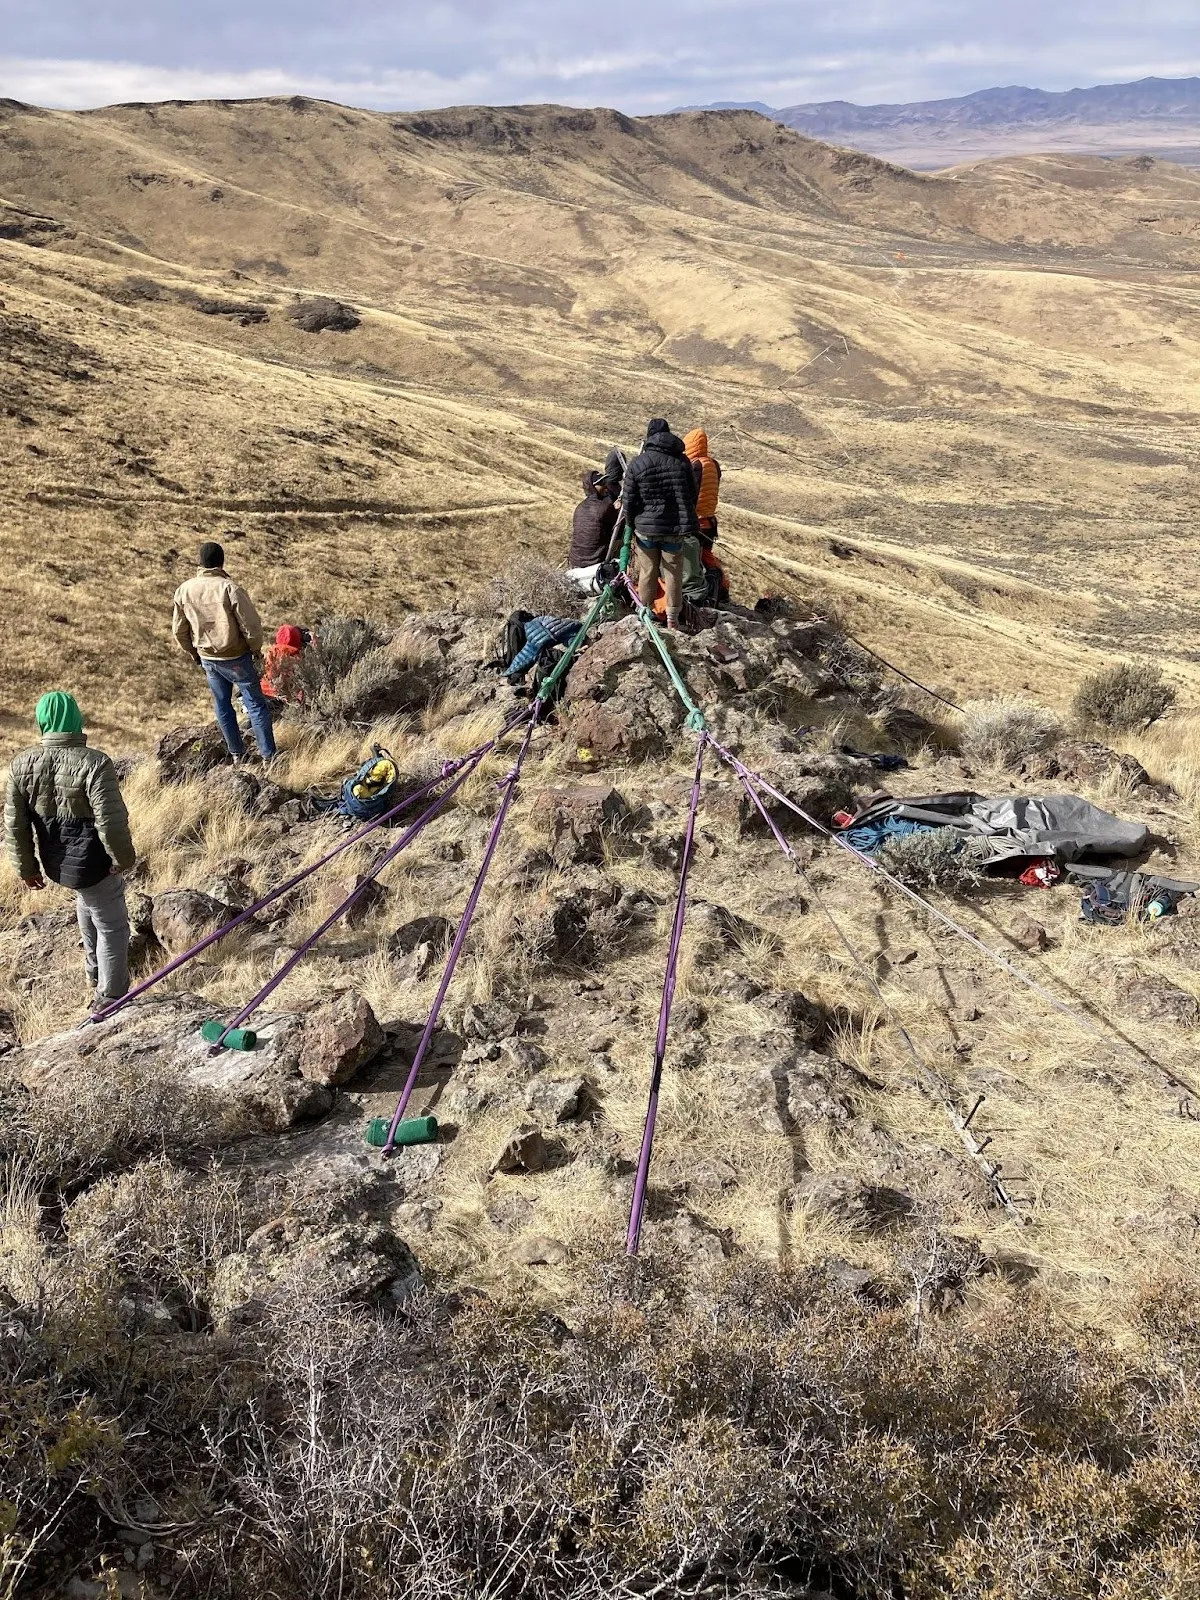
The home anchor was four glue-in bolts and two ground plates. The ground plates were necessary to make sure we had good anchor spread, and because it was hard to evaluate the size of the rock we were bolting into. The two ground plates and two outer bolts were each stabilized with a sliding X with limiting knots in spansets, and then each of those sliding Xs were equalized with the inner two bolts (which were in larger rock) with another two sliding Xs with limiter knots. These two sliding xs were then extended with a spanset on each one, and connected together with a spanset quad. Two 8mm whoopies came off the spanset quad to the two rings on the hang point, and the rings were stabilized with two stabilizer bolts.
Far Anchor
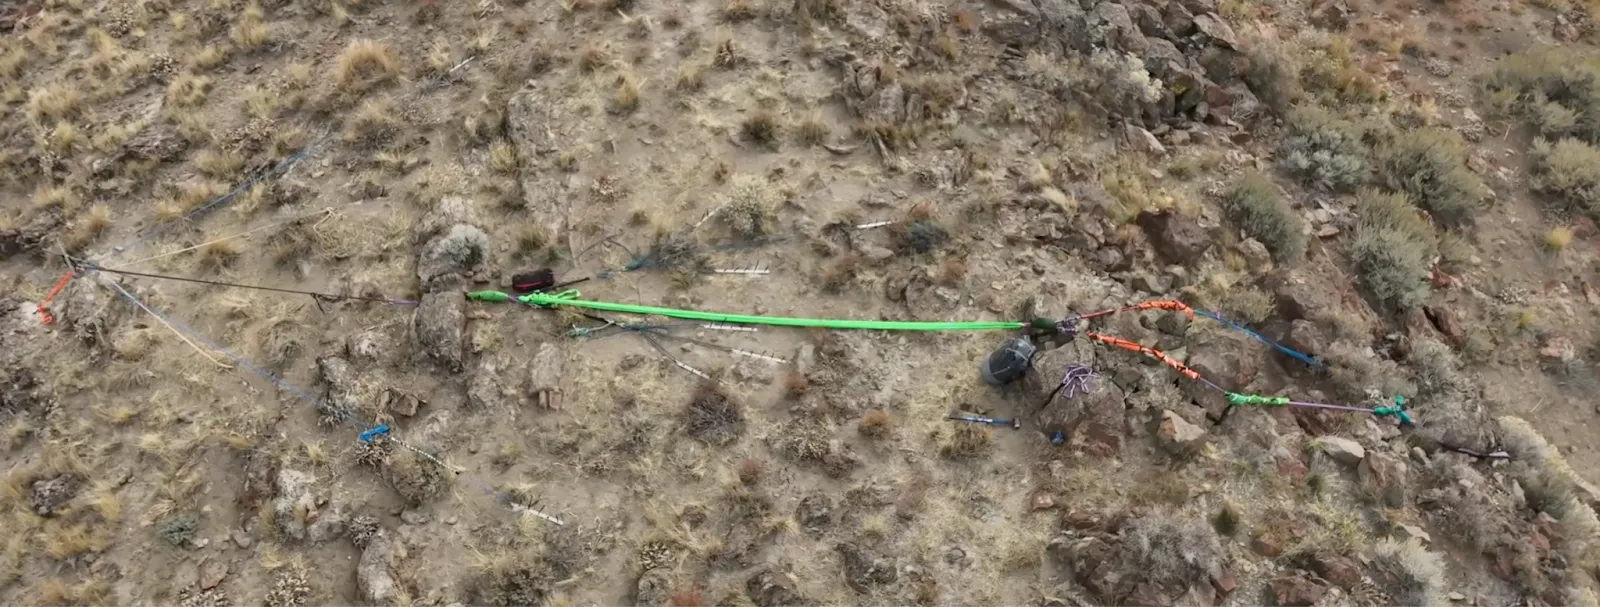
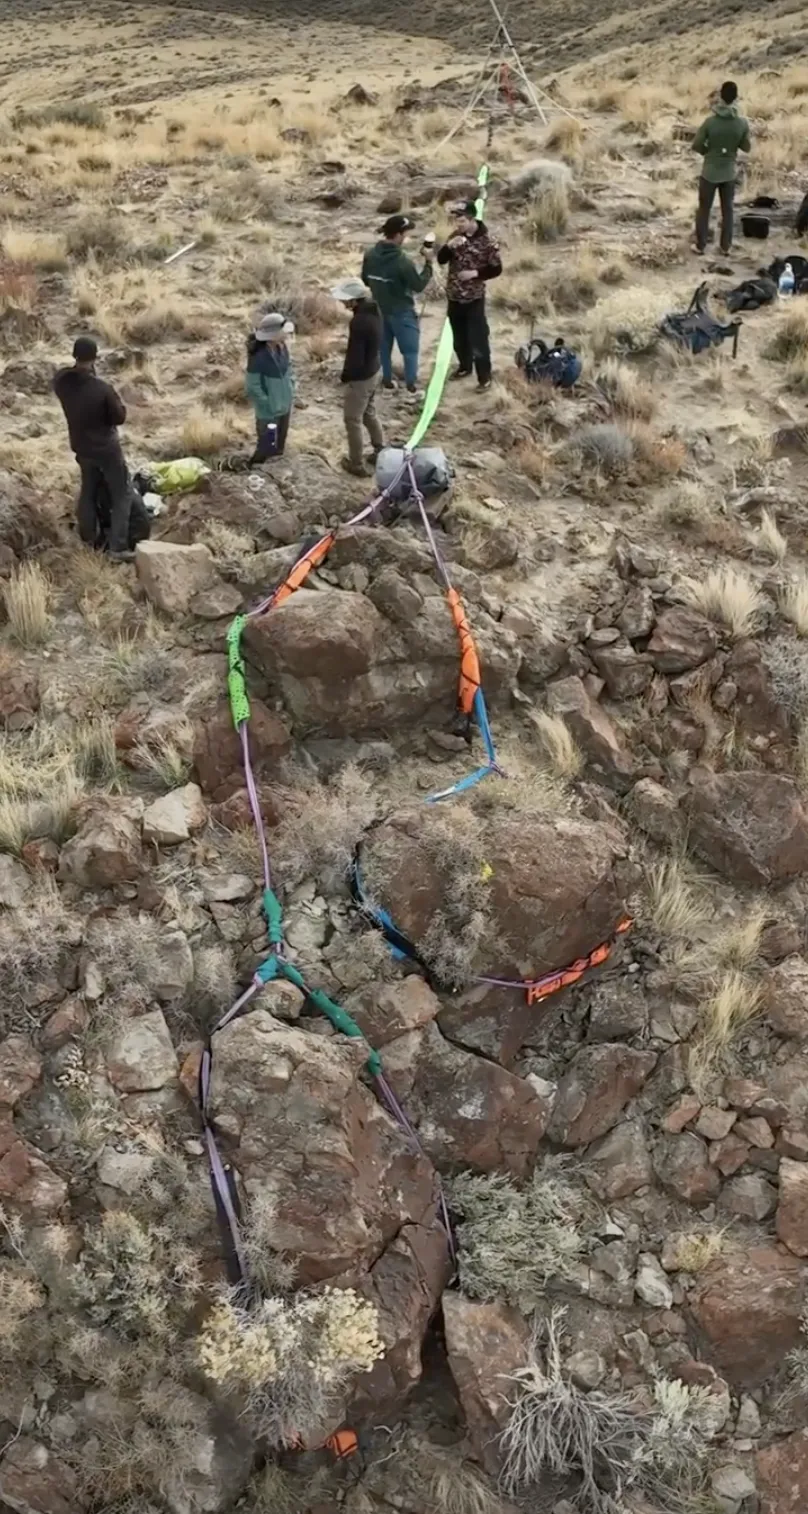
The static anchor was two large boulder wraps with redundant spanset chains, combined with two sets of three ground plates. The master point joining the greenspanset and the 11mm BFKs from the plates was a chunky BFK of spansets.
To make the spansets redundant, they were connected with a redundant sheet bend where the main sling was threaded through the knot's tail to prevent the knot slipping. The last spanset to be connected had to get the end loop clipped with a soft shackle. For more information, you can check out this post on SlackChat on how to make spansets redundant.
The green spanset passed through a redirect bolt, and connected to two 8mm whoopies going to double rings on the hang point. The redirecting bolt was installed to create a downward force on the hangpoint to help stabilize the A frame. Without that redirection, the anchor points (spanset chain and stakes) would have been at a similar height as the hang point which would have caused the A frame to float and possibly fall over.
There were four more ground plates to stabilize the sides of the A frame to ensure it wouldn't flip over. The hang point also had a stabilizer bolt directly below it.
Tagging the Gap
We had three bags filled with UHMWPE rope, mostly 4mm, with the exception of 400m of 3.5mm. Ideally, we wanted all 4mm, but we didn't have enough.
Additionally, we had three bags of tag line—two filled with 3/16th inch diamond braid polyester line aka Farmer Boy, and the third with 5mm accessory cord and Tenex.
Teams walked from the main side to the far side laying down the shower curtain and pull-line parallel to each other. We maintained about a 10m separation as we moved. Every 500m, we clipped the tag line to the curtain and attached a visibility sock to the pulley as well so the tag line would be visible before sending out the webbing. In retrospect, we wish we had included lights on the tag line because it was in the air for several days. These visibility socks were retrieved when pulling the webbing across. When we reached the end of a bag, we spliced the curtain connections to continue seamlessly and knotted the tag line.
Once we reached the anchors, we tensioned the curtain while the team in the gap freed the line where it was snagged in the bushes. First the curtain rose into the air, and then we added more tension to the tag line.
To connect the pull line, we used double sheet bends with a Yosemite finish. We joined the UHMWPE lines with long (~1.3m) end-to-end splices.
Lessons from our tag:
- Consider using a compass to maintain a straight line towards the static anchor.
- Put visibility markers on the shower curtain because it could be up for days before the highline goes out.
- Make sure all pulleys that will slide on the shower curtain have bearings and metal sheaves.
- Check your knots, we had one connection point in the pull line come untied which led to delays and complications.
Shower Curtain
The home side curtain anchor was built off of 4 plates. Two pairs of plates were connected with static rope tied into a quad for each pair of plates, and the 2 quads were connected with a spanset tied into a sliding X with limiter knots. This was extended with 2 whoopies to a double ring hanging masterpoint. The static side curtain anchor was two boulder wraps with purple Balance Community Spanni's extended and equalized with 70m of static rope.
We tensioned the curtain up to 5 kN before sending webbing. We tensioned it with pulleys on two equalized double Blake's Hitches, and let it sit with 5 wraps in a Lynx 4 with a double Blake's Hitch behind on one side. Note that we used 6 wraps of 4mm Amsteel on the Blake's Hitches to grip the shower curtain. On the other side it was anchored with a double Blake's Hitch, a clutch behind that, and a Figure 8 tie off behind that. While the webbing was being sent out, the force on the home side was shared between the Lynx 4 and the Blake's Hitches. The dynamometer was only attached to the Lynx 4, so we don't have an exact value for the tension on the curtain while the webbing was being sent. See Phillip Queen's blog post for more details and improvements on our curtain tensions system.
We used innovative remotely releasable connections between the shower curtain and the highline. These were designed, tested, and deployed by Pierce Kenji-Hunsaker. To give a brief explanation, the connectors would separate when the highline was tensioned and the curtain line lowered below the webbing, leaving a piece of stiffened webbing behind on the backup loop. He is working on his own review and report of the system that will be published separately with significantly great detail.
Visibility Line
We reused the shower curtain as our visibility line, using the releasable shower curtain setup to also deploy the visibility items for air traffic. While this saved us time and material, we had insufficient air traffic visibility for the four days where the shower curtain and tag line were in the air and we waited for a weather window to send the webbing.
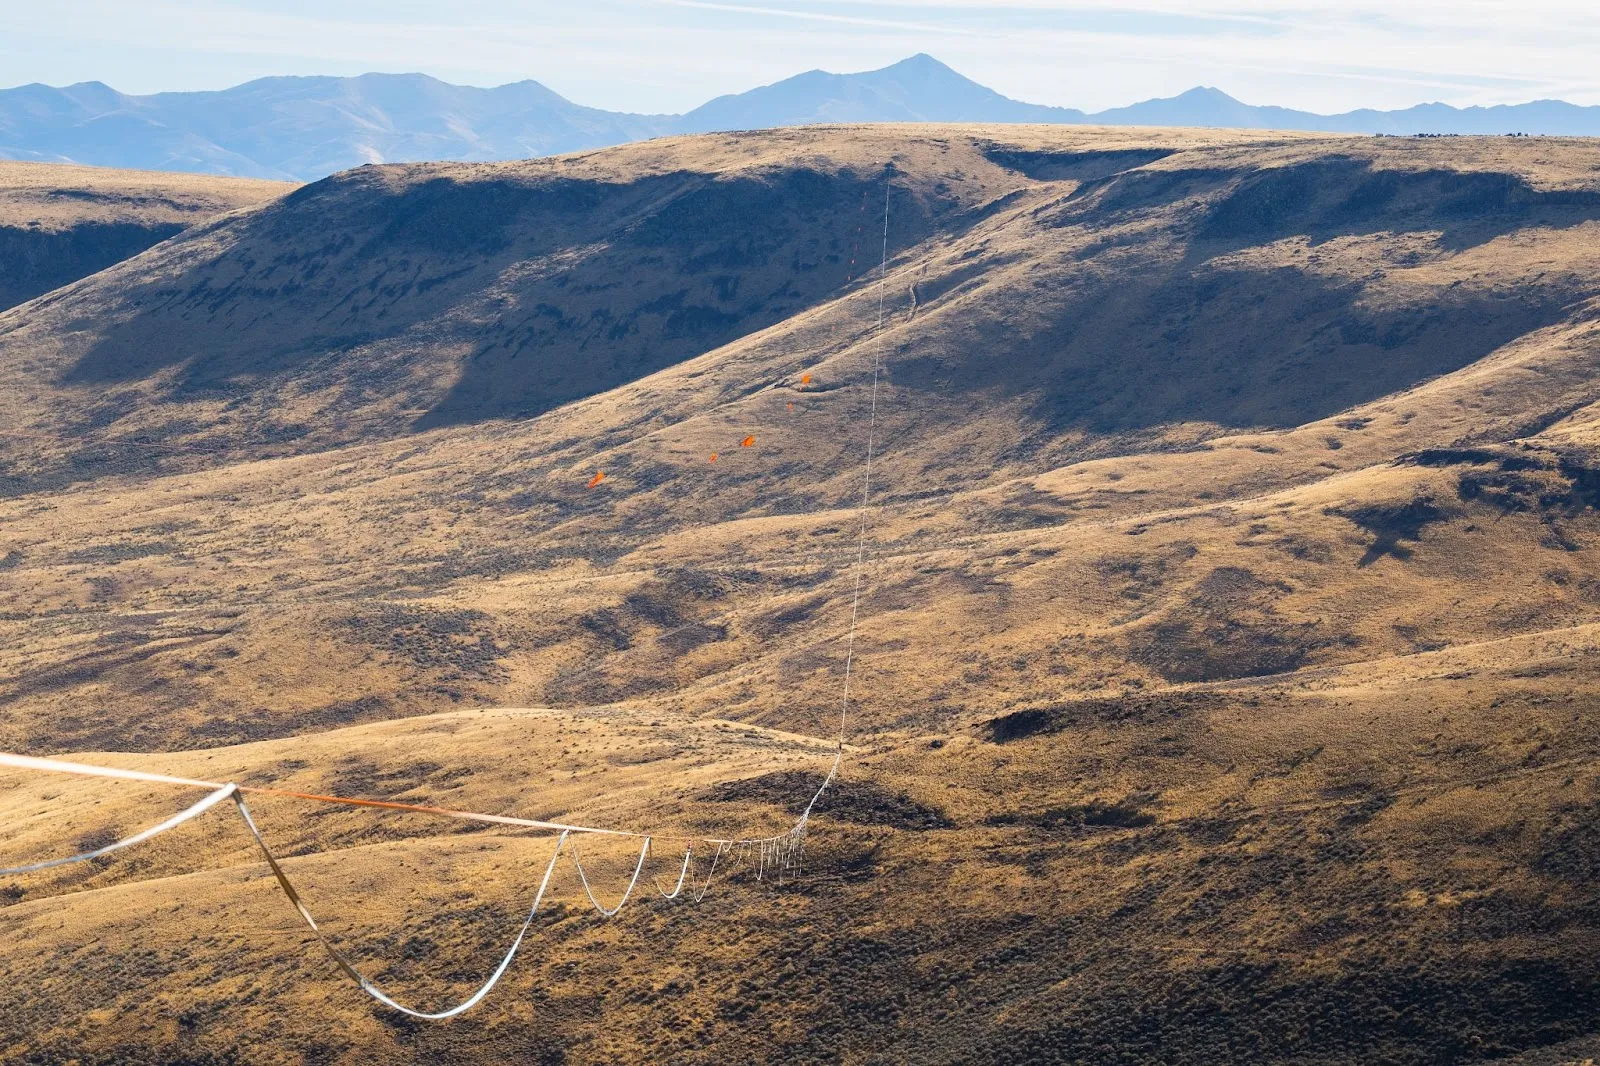
Wind Socks
We mainly used 5' windsocks from Amazon. We weren't happy with the size of the 5' windsocks, they were too small, but they were the largest we could find that were relatively affordable. We also hung 4 big orange queen sized sheets, in an effort to add visual surface area to the sight line. Thanks to the Ananatopisme project for the idea to use bed sheets.
Lights
We had around 13 lights on the line, with pretty inconsistent spacing. There was 1 every 200m or so, but with a ~900m gap from the static side and a ~75m gap from the home side. We used a combination of two lights. One from Lumastrobe and another from Grainger.
Both of these lights used three D batteries to power LED lights in plastic lenses that spread the light. The battery life on these lights is about 2 weeks, so they were sufficient for the time we planned to have the line up for this project.
We don't like how expensive the lights are and how heavy they are with the D batteries. We haven't found cheaper, lighter lights that meet our brightness and battery life requirements yet though. In Europe it is also common to use infrared lights for added visibility for pilots wearing night vision goggles, but it's not clear that that's necessary in the United States.
Visibility Line Failure
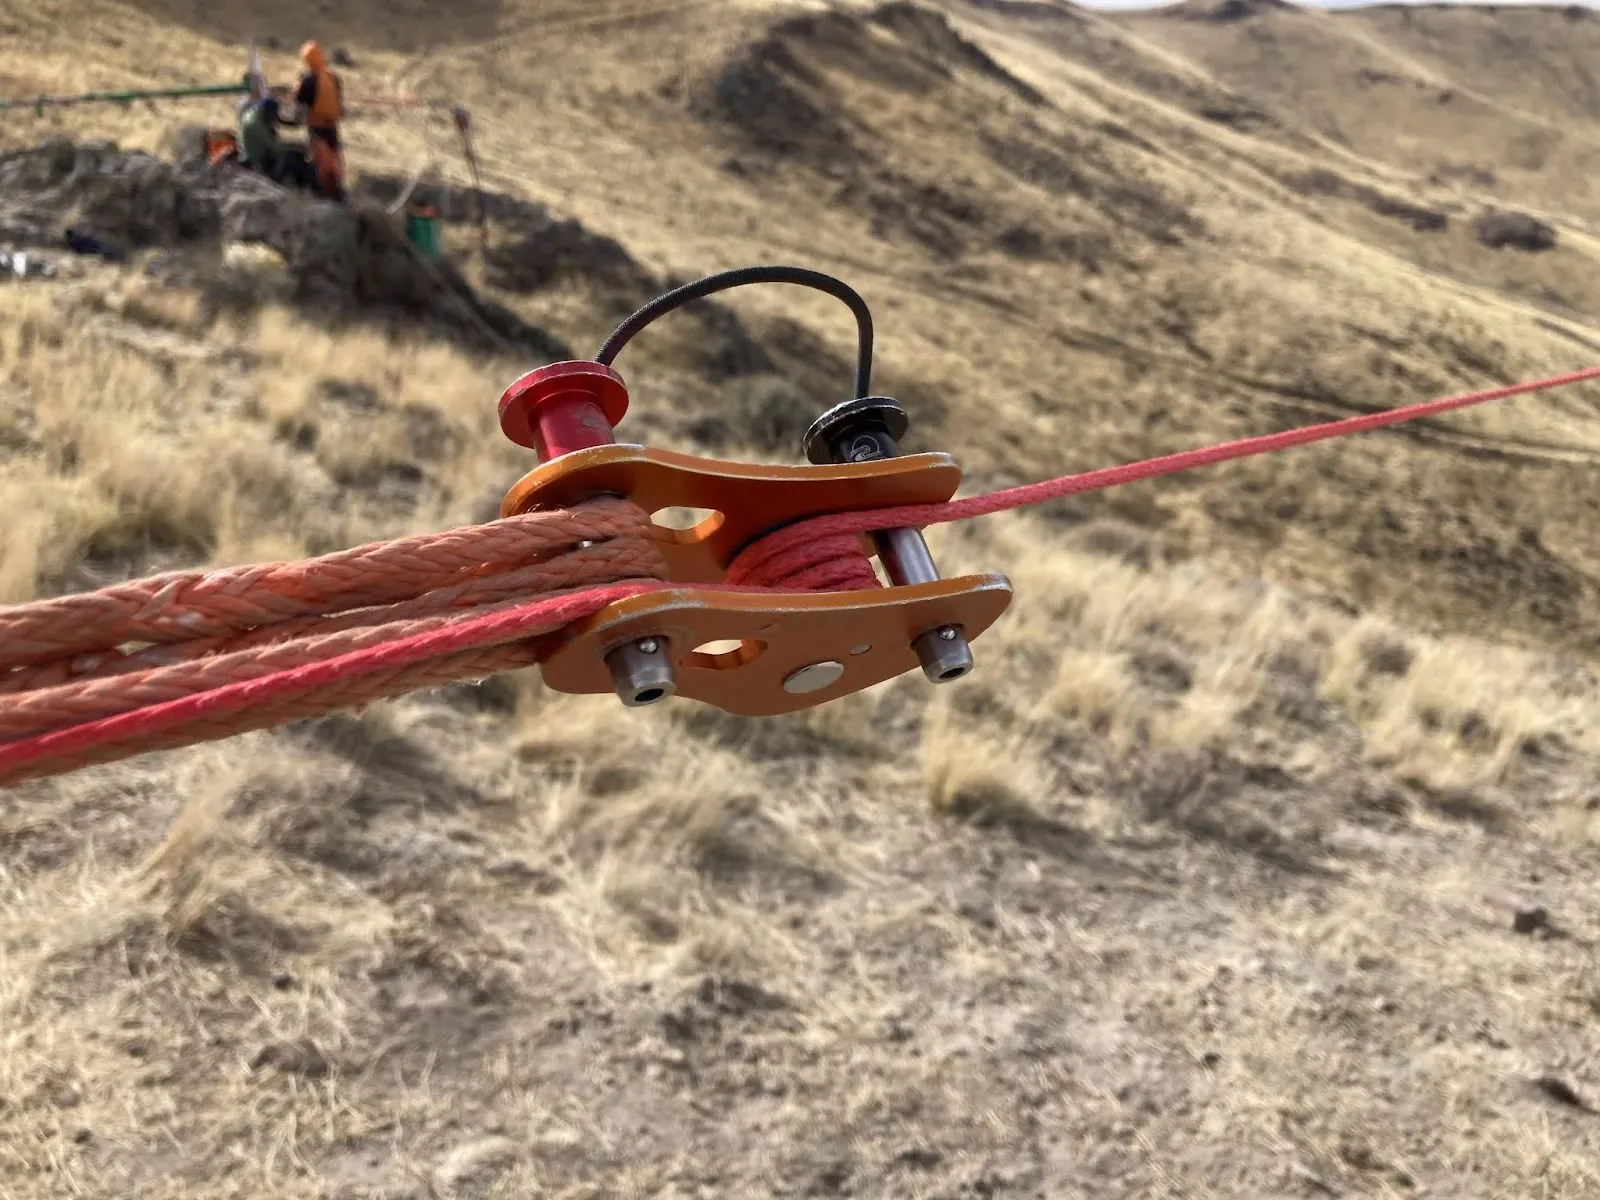
While we were picking up the webbing on October 25th, the dyneema shower curtain / visibility line snapped, raining visibility items down around the team. Luckily, no one was hit. Our best guess is that one of the custom rollers abraded through the UHMWPE visibility line. The line was vibrating audibly in the wind throughout the project. In addition you could feel the vibration in your body and feet when standing between the anchor plates. It seems likely that weighted rollers resting on the vibrating line caused the abrasion, similar to the way that leash rings left on a high tension, long highline cause abrasion. Cases of leash rings abrading highlines have been observed in the past. We've observed light abrasion personally at the 1.5km Return to Sender line in Oregon and Alonso Rogriguez had a line cut by this type of abrasion. More details on the specific cause of the abrasion and ideas for improvement will be shared separately by Pierce.
Day by Day
Friday 18th October - Arrival day
People started arriving and setting up camp.
Saturday 19th October - Gear prep and anchor scouting
Lots of flaking, taping and splicing to get the tag, curtain and webbing ready. We began scouting and building anchors.
Sunday 20th October - Tagging day
We tagged the gap with both curtain and tagline. We connected the tagline to the curtain at 4 places, putting a windsock at each connection, then lifted the curtain and tag, leaving the curtain partially tensioned and the tag line at hand tension.
Monday 21st October - Fixing the tag and endless webbing prep
We had planned to send webbing on this day, however due to weather expected on Wednesday evening, we held off. More anchor reinforcements were added and, late in the day, it was realized that the tag line seemed to have broken. A team went into the bowl and found a knot attaching two taglines had come undone. They recovered the system and reattached the tag to the anchors. We noticed that it seemed like the tag line was still stuck at this point. It was getting dark so we had to wait until the next day to continue investigating.
Tuesday 22nd October - More fixing and tweaking
To figure out why one of the wind socks appeared to be stuck, we lowered the shower curtain and tag line to the ground. A team went down to investigate. They found that a non bearing pulley had stopped rolling and the plastic sheave had a deep gouge worn into it. We replaced the pulley with a metal sheaved bearing pulley, inspected the curtain around where the pulley was and retensioned the curtain. Meanwhile the static team continued reinforcing their anchor.

Wednesday 23rd October - Wind storm and practice rescues
The static side team added ground plates to complete their anchor and did a test pull of the anchor. We ran through rescue scenarios for the entire group on the line we rigged between two vans. As forecasted, an intense wind storm arrived around sunset. We measured gusts over 40mph (64 km/h). One tent in our camp was blown away. A group went to secure the tent at the tension side anchor holding the webbing because we feared it might blow over and scatter the webbing.
Thursday 24th October - Sending the webbing and night sessions
We woke up early to start rigging around 6 am. We began sending webbing around 7 am. Webbing reached the far side around 12 pm. While we tensioned the line we intended to slowly release the curtain. While releasing the curtain, the curtain slipped while someone tried to release tension with a Piranha descending device and the curtain rapidly de-tensioned. The curtain was significantly melted but did not break. Nearly all the curtain connections automatically released, with only 4 remaining. The line was ready to walk at 3:20pm, initially tensioned to 8 kN.
Cary went onto the line to clean the last 4 curtain connections. During Cary's walk Pierce went out on the other side of the line and disconnected the 4th connection that was close to the main side. Logan and Emile each had small walks to test out how much walkers could feel other walkers on the line. Cary got off at 5:16 and the line was finally detached from the curtain. Danny got on the line to attempt to send around 4:50pm. He whipped at roughly 300m and returned to the static side. The line was re-tensioned and Tom Doocey crossed, starting at 5:50pm, just before sunset and ending in the dark. Philip got on briefly at the other side after Tom's first fall. Emily had a very intense, long, cold night crossing after Tom. She walked from roughly 10:30 pm to 3:30 am in freezing temperatures. She was followed by Alex Bowersox, who got on at 4:30. Alex made it about 1.4km and then rolled back to the anchor when asked to maintain the timeline for daytime send attempts. Throughout the night we had people on both sides of the line and the tension due to the wind went up to 13 kN. The line had at least 100m of side-sag and was underneath the curtain, which the walkers could tell by crossing under the visibility lights as they walked.
Friday 25th October - Send, rescue, derig, visibility line failure
RJ got on the line at around 6:30 for a brief inspection/session. Danny got on the line at 8:07am. He completed his send at 10:39am. After Danny, Emile got on the line. He was walking steadily until the wind, which had been slowly increasing, got too intense. He fell around 12:07, not quite halfway into a send attempt. The webbing tension was increasing steadily until it reached 17.8 kN. People at the main anchor lowered tension on the line with the soft release while Emile (and ground team) did the planned rescue procedure. At 12:58 Emile had the rope and rappel device and at 1:06 pm he was on the ground, about an hour after he decided to exit. After this the wind dropped again we had a meeting to discuss what to do about the wind speeds exceeding the forecast. During this time Mike went out about 400m and came back, not wanting to commit to more walking given the unpredictable conditions.
As we were discussing what to do the wind progressively crept up again until the line reached 19.2 kN tension. The max wind gusts recorded were 24mph (38.6 kph) that day, with an estimated peak of 22mph (35.4 kph) while Emile was on the line. The wind was perpendicular to the line, coming from the South. We decided that we were going to lower the webbing to the ground as this wind was not in the forecast and higher winds were forecasted for the future days. While webbing was being recovered the curtain inexplicably broke, raining visibility artifacts down around the team. Luckily, no one was hit. Our best guess is that one of the rollers abraded through the UHMWPE because the curtain was vibrating audibly in the wind. More weather was coming in, and would keep the line down for the rest of the project dates. So it was decided not to rerig.
Saturday 26th October - Visibility line recovery, pack up
We dismantled the anchors, recovered the curtain and visibility items, and sorted gear. We removed the rebar stakes from the plates with pulley systems and the A frames. Some of the stakes were extremely difficult to remove, requiring 9:1 pulley systems with multipliers to be removed.
Sunday 27th October - Exodus
We finished packing up our personal campsites and left Thacker Pass for Winnemucca.
Weather
On Monday the 21st, we saw high winds were forecasted for Wednesday the 24th, so we delayed sending the webbing. We had a calm window on Thursday the 24th for sending webbing, with acceptable winds forecast for the following three days. On Friday the 25th, early afternoon gusts significantly above what was forecasted forced us to derig. The forecast called for 5 mph winds with up to 15 mph gusts, but gusts as high as 24 mph were recorded at the weather station. Because of the size of the line, and the fact that the force of wind increases with the square of velocity, this 9 mph difference had a large impact on the line. In addition, the perpendicular angle between the wind direction and the highline was the worst case for force on the line due to wind.
We tried to stay under 19 mph (30 kph) wind speed, the speed above which most damage occurs according to the ISA's Wind Advisory. The forecast gave us a roughly three and a half day weather window within these wind values, but in reality it was less than 30 hours. This is a good reminder that even the best forecasts can have significant errors, and you always need to be ready to adjust plans based on actual conditions. The Wind Advisory also includes recommendations on considering weather forecasts before and during projects, which we followed quite closely.
Even with the unreliability of the forecasts, they proved an invaluable tool. There were a number of days leading up to the rig day that had good weather, but the forecasts correctly showed us that bad weather was coming in. When in remote areas, it's crucial to the project to have access to good forecasting. We were lucky to have access to a Starlink that allowed us to watch the weather forecasts closely, following both NOAA forecasts and using apps like Windy throughout the length of the project. We shared these forecasts every evening in the group meeting when planning what to do the following day.
Based on the winds we observed and the uncertainty in forecasts, we are lowering our wind thresholds by 3mph for walking holds and derigs for future projects of this scale.
Rescue plan and execution
During our pre-gathering meetings we discussed several rescue plans. A normal highline rescue, where a rescuer slides out from the anchor, with a crew at the anchor holding the end of a rope, is only practical within a few hundred meters of an anchor. Given the low portion of time a walker will be in that area of the line we wanted other options. Drawing from the experience of the Ananatopisme project, we created an anchor that allowed us to detension the line with a person on it and a rappel exit system.
Communication
The first step of the rescue process was communication. Each walker carried a Rocky Talkie, and at least 1 person was at the anchor whenever someone was walking (including at night). The Rocky Talkies, both 2 and 5 watt, worked well with line of sight between anchors, but did not work at long distances without line of sight. So, there were times we needed messages relayed. For example, the crew below the line was not able to communicate with camp directly during the rescue, and messages had to be relayed by people at the home anchor.
Detension highline to the ground
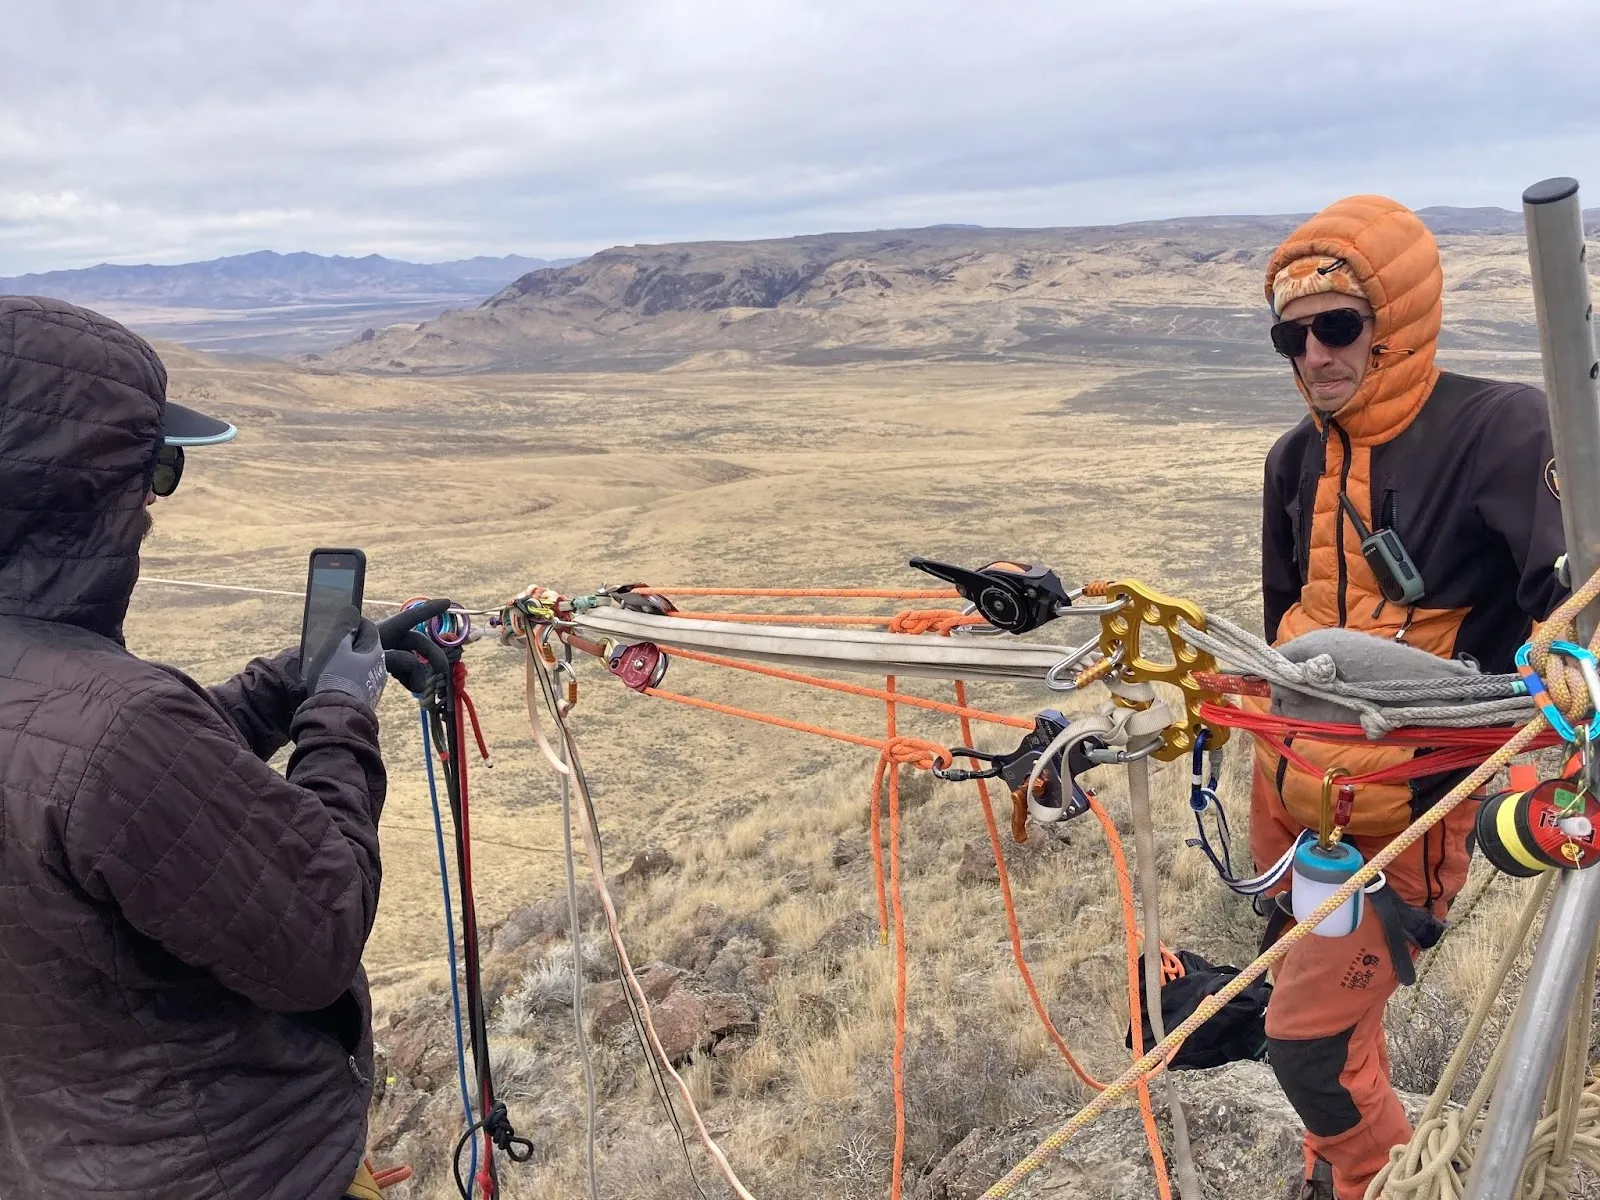
The ability to detension the line made rigging and derigging efficient at the Ananatopisme project so we wanted to have a similar system. This would allow us to decrease the tension if the wind increases and, in an emergency, lower an incapacitated highliner to the ground without sending a rescuer. We had a similar topography so we expected the webbing to be mostly on the ground with the weblock released about 80m.
Between the tension side weblock and anchor were a 60m soft release and two 200m static ropes in large brakes (a CMC Clutch and CMC Rescue MPD), all in parallel. The two static ropes allowed us to release 100m on the parallel 2:1s. It was very important to us that the release system was redundant and capable of handling high forces, as we knew there was a chance we would need to release tension with someone on the line.
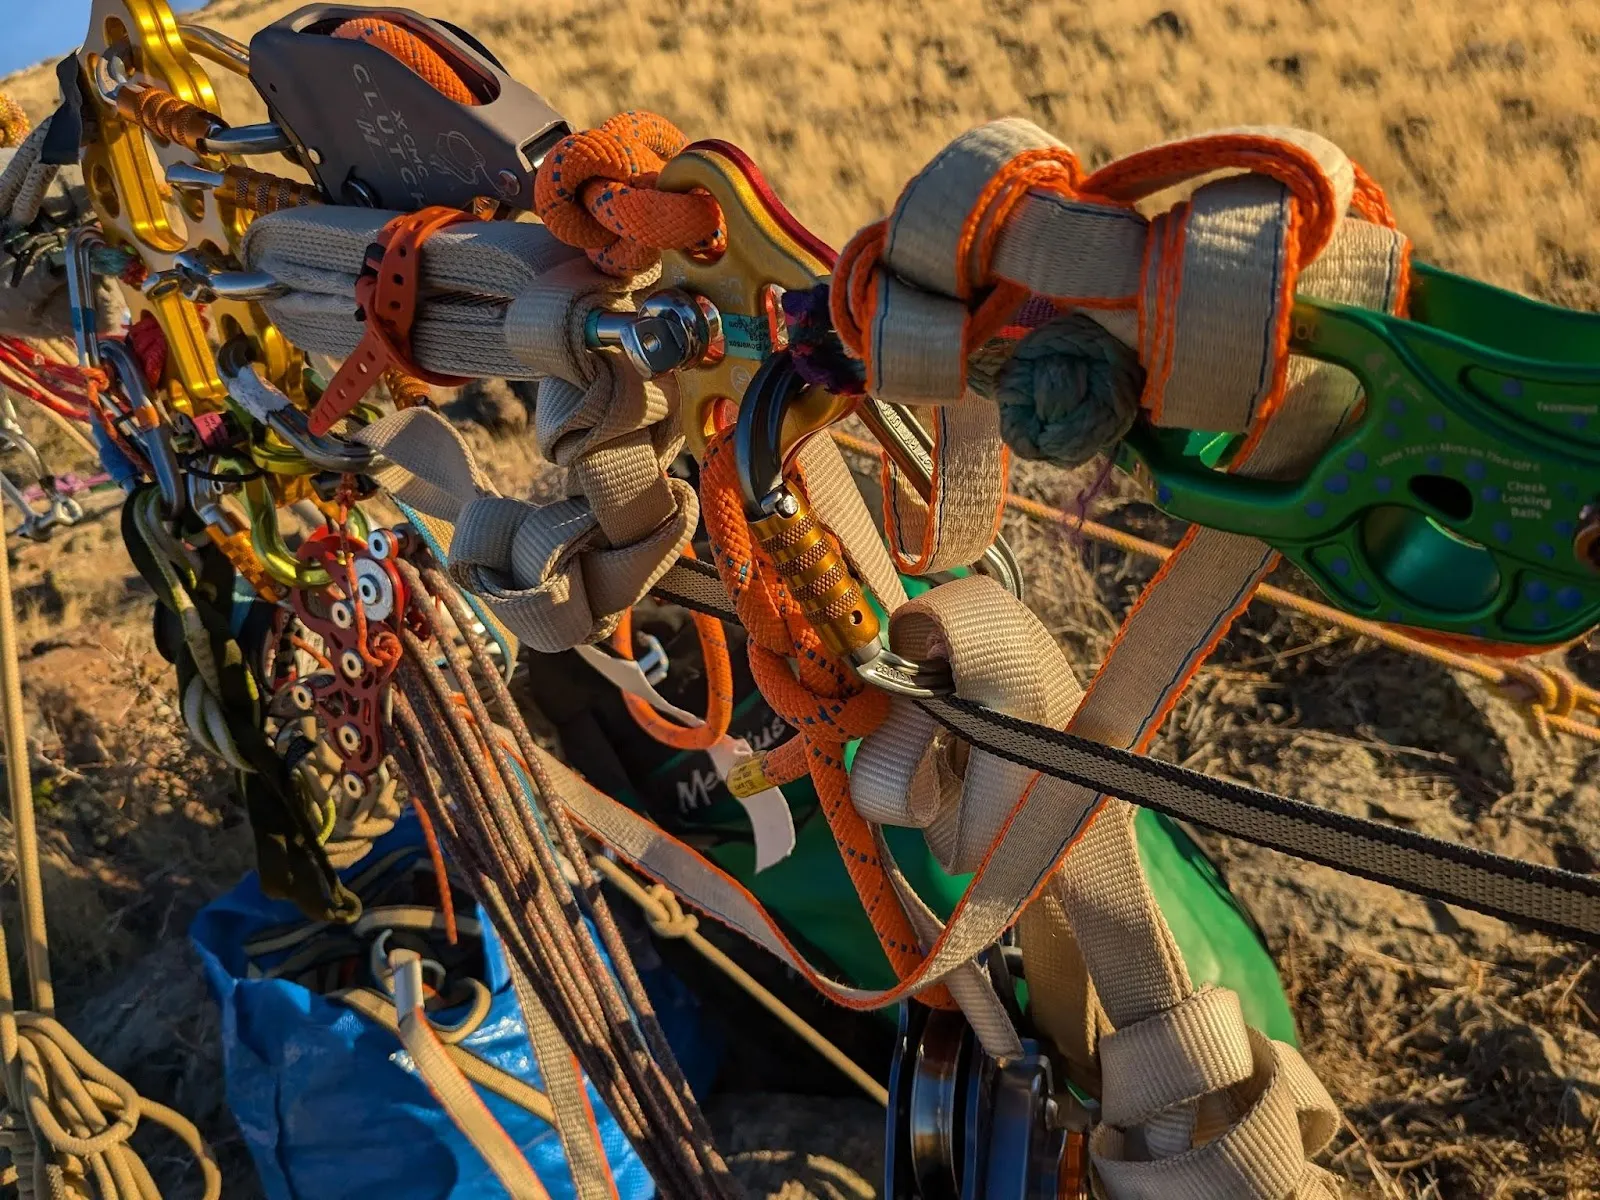
Detensioning starts with the soft-release. The soft release held the tension while the line was rigged with the release pulley systems acting as a backup. Once there was some space between the rigging plates we changed each static rope to be in a 2:1 pulley, with single pulleys on the front rigging plates.
Detensioning continues with the ropes after the soft release is done.
We originally looked for a 400m static rope to allow us to release 100m on a single 4:1, but were not able to find them. We also did not have a solid plan on how to back up the 4:1 to retain redundancy. The 2:1s worked well, but did require water to cool them down. The Clutch and MPD are both rated to very high tensions, and we would not have been able to work with the high tensions we had with standard rope brakes like the GriGri. Using rescue grade devices gave us good control of the tension, and peace of mind that the system would slip instead of break if overloaded. Of the two devices the MPD performed better, allowing more control over the release and better performance if pulling tension back through the system is required.
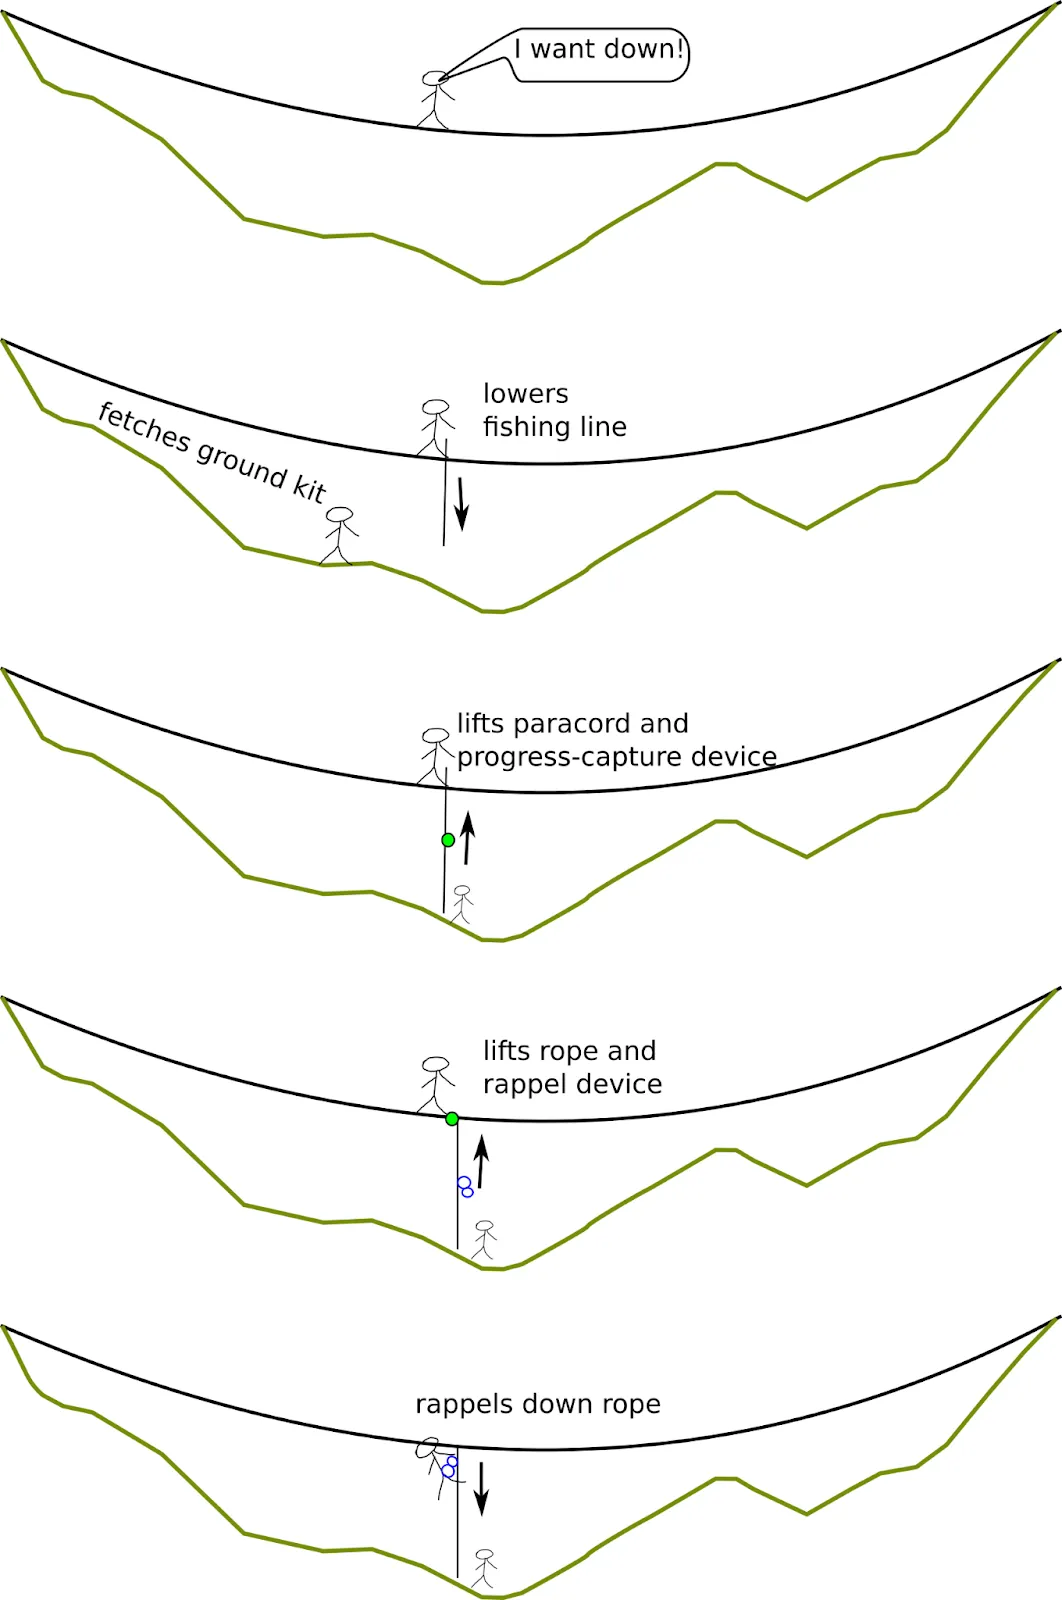
Rappel Exit System
Each highliner carried what we called a walking kit:
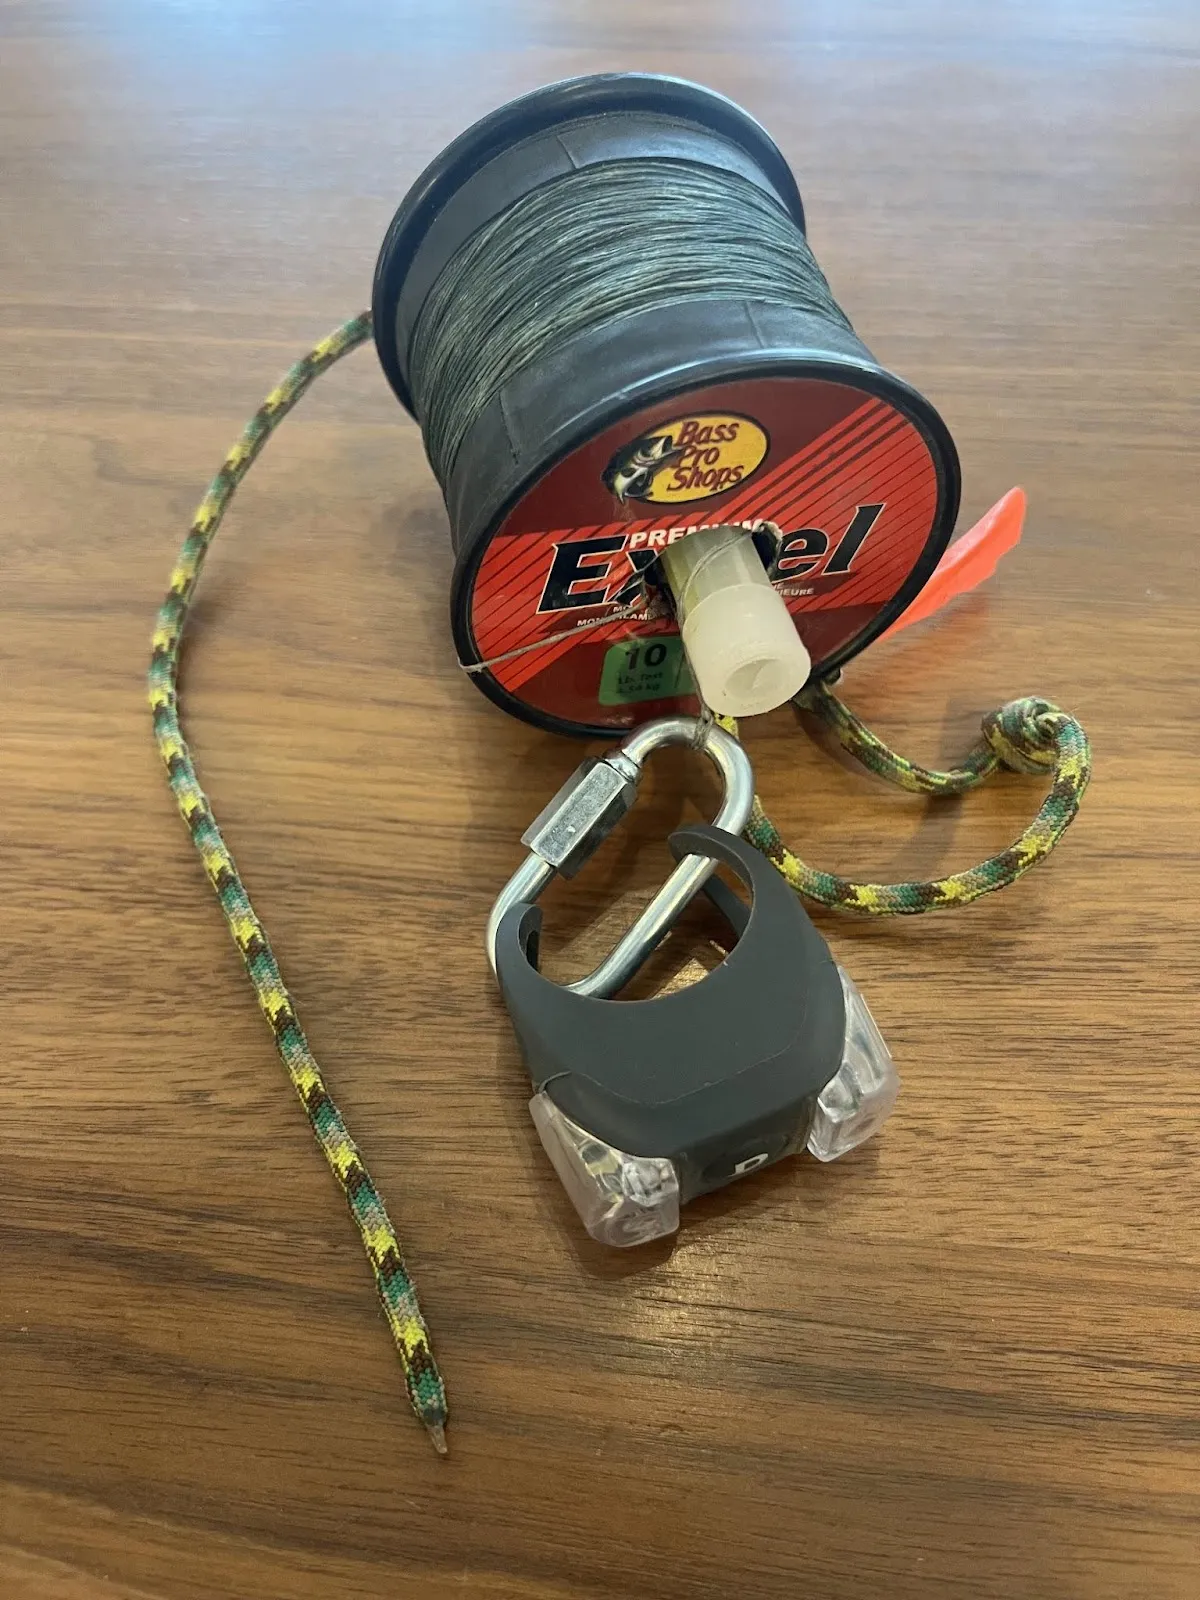
- A spool of fishing line (300m of 0.43mm with 36.2kg breaking strength) with a glow stick and light tied to the end. A piece of paracord was threaded through the spool, one end tied to a back left gear loop, the other end tied to a quicklink clipped to a back right gear loop. The spool was connected so it was secure when walking yet easy to access if needed.
- Gloves with rubber palms, important for grip on slippery Silk 99 webbing and the fishing line.
A ground team rescue kit contained the following flaked in a backpack top to bottom:
- Small progress-capture pulley (Edelrid Spoc) at the top of a tagline (200m of 550 paracord)
- Rappel device (Imlay CRITR with HollowBlock 3rd hand) at the top of a polyester cord (366m of ¼” / 6.4mm pull-line, folded in half).
The highliner initiates an exit by lowering the glow stick and light to the ground team, using the quicklink as a weight. During Emile's rescue we learned that the small quicklink wasn't heavy enough to overcome the lift from the wind. Luckily he had a mostly full water bottle with him. With the added weight, the fishing line reached the ground. We will add more weight to the kit in future projects. Next, the ground team connects the tagline and progress capture to the fishing line. The highliner pulls the fishing line up, hand over hand, then uses the progress capture pulley to assist with lifting the rappel rope. When the rescuer gets the rappel system they clip the carabiner on the pre-knotted rope to the leash ring and the carabiner on the belay device (with third hand already attached) to their belay loop. Then they lift themselves onto the rappel system, perform an audio walk through on the radio as a form of buddy check, and then untie their leash and rappel down the rope.
We considered using this system with an active rescuer. A rescuer slides from an anchor to the highliner, pulls up the rappel device, connects the rope to the highliner and the rappel device to the highline, lowers the highliner, then rappels down.
The rappel exit system worked well, thanks in a large part to two practice sessions on a small line we rigged, for lack of any trees, over two van roofs. During these sessions the entire team got familiar with the system and provided feedback that improved the walking kit. The system had room for improvement. We rappelled on a pull line because it was the longest single strand we had but it'd be nicer to use a 20-25g/m rappel rope.
On the actual rescue, it took one hour from Emile's call to him being on the ground. The line reached a peak of 17.8 kN while he was on it, with a max wind speed of 22 mph during a gust. We would like to get our friends to the ground faster in the future.
Risks and Mitigations
The risk of crossing long highlines cannot be completely mitigated by a rescue system. For example, in the time it takes to reach the ground, the wind could reach speeds that would destroy the line or lightning could strike. In addition, the highliner could hit the ground if the wind stops or switches directions while they are on rappel. We don’t have concrete data on how far or fast the line moves when wind stops suddenly but we have anecdotally estimated 50 to 100 meters horizontally and tens of meters vertically. Rigging long highlines over water can mitigate this issue, for example the 1.9km and 2km lines in Asbestos, Canada over a decommissioned, water-filled quarry.
Further Reading and Citations
- Ananatopisme: Much thanks to Arthur Lefebvre for publishing the Ananatopisme Report and answering many questions directly. Don't miss the technical document linked from the bottom of his page
- More information about the mine from a group opposing it and from the mining company website
- GaiaGPS of the Line
- Grog Splice Demonstration Video
- Double Wrapped Grogs from Riggerous Thinking
- SlackChat Post on Redundant Spansets
- Tensioning Highline Curtain Rods from Riggerous Thinking
- Wind Advisory from the ISA